How do we install Oracle Data Guard as a Physical Standby for Disaster Recovery?

- How to convert a database from Physical Standby to Logical Standby in Oracle Data Guard - 2 June 2025
- How to roll back an Oracle Database using a restore point in a Data Guard environment - 28 April 2025
- How can we increase performance on Oracle GoldenGate Replicat target with parallelism? - 19 March 2025
In this article we will see step by step how to install it Oracle Data Guard as Physical Standby on Unix. By using it, we have the possibility that changes made in the primary base are automatically transferred to another standby base. The standby base during this process is not accessible unless it is activated Active Data Guard which enables us to make it accessible for reading data.
How it works and what options we have in Oracle Data Guard can be seen in detail in the article here.
This article comes to replace an older article with all the steps being much more detailed.
To do the installation we will use the tool Data Guard Broker / DGMGRL.
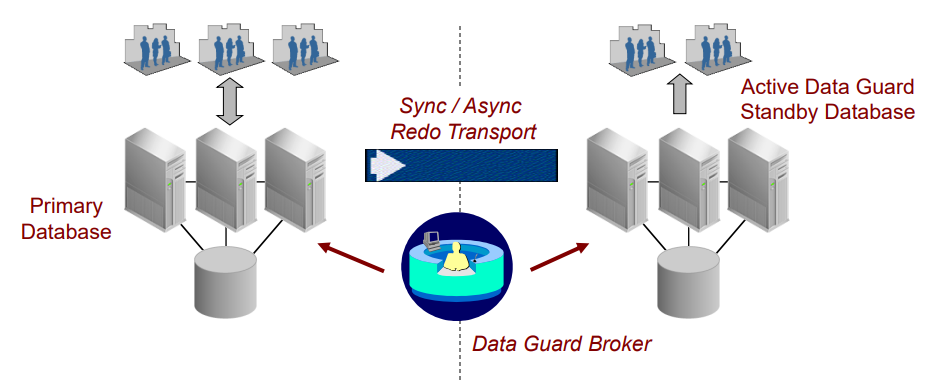
Below is the Data Guard infrastructure diagram:
Prerequisites
For starters we should have set it up Oracle Database Software on the primary and on the standby server and Oracle Database in primary to archivelog mode. How we do these installations can be seen step by step in the article here.
Installing Data Guard
Go to the primary and standby server and pass the names of the servers with their IP:
vi /etc/hosts
172.21.64.11    oracledev1
172.21.64.22    oracledev2
Then we change it tnsnames.ora on both servers (as service_name we will set the name of the instance):
vi $ORACLE_HOME/network/admin/tnsnames.ora
ORADEV =
  (DESCRIPTION =
    (ADDRESS = (PROTOCOL = TCP)(HOST = oracledev1)(PORT = 1521))
    (CONNECT_DATA =
      (SERVER = DEDICATED)
      (SERVICE_NAME = oradev)
    )
  )

ORADEVDR =
  (DESCRIPTION =
    (ADDRESS = (PROTOCOL = TCP)(HOST = oracledev2)(PORT = 1521))
    (CONNECT_DATA =
      (SERVER = DEDICATED)
      (SERVICE_NAME = oradev)
    )
  )
Then we change it too listener.ora on both servers:
vi $ORACLE_HOME/network/admin/listener.ora
On primary (oracledev1):
LISTENER =
  (DESCRIPTION_LIST =
    (DESCRIPTION =
      (ADDRESS = (PROTOCOL = TCP)(HOST = oracledev1)(PORT = 1521))
      (ADDRESS = (PROTOCOL = IPC)(KEY = EXTPROC1521))
    )
  )

SID_LIST_LISTENER =
  (SID_LIST =
    (SID_DESC =
      (GLOBAL_DBNAME = oradev)
      (ORACLE_HOME = /oracle/app/oracle/product/19.3.0/dbhome_1)
      (SID_NAME = oradev)
    )
    (SID_DESC =
      (GLOBAL_DBNAME = oradev_dgmgrl)
      (ORACLE_HOME = /oracle/app/oracle/product/19.3.0/dbhome_1)
      (SID_NAME = oradev)
    )
  )

ADR_BASE_LISTENER = /oracle/app/oracle
On standby (oracledev2):
LISTENER =
  (DESCRIPTION_LIST =
    (DESCRIPTION =
      (ADDRESS = (PROTOCOL = TCP)(HOST = oracledev2)(PORT = 1521))
      (ADDRESS = (PROTOCOL = IPC)(KEY = EXTPROC1521))
    )
  )

SID_LIST_LISTENER =
  (SID_LIST =
    (SID_DESC =
      (GLOBAL_DBNAME = oradev)
      (ORACLE_HOME = /oracle/app/oracle/product/19.3.0/dbhome_1)
      (SID_NAME = oradev)
    )
    (SID_DESC =
      (GLOBAL_DBNAME = oradevdr_dgmgrl)
      (ORACLE_HOME = /oracle/app/oracle/product/19.3.0/dbhome_1)
      (SID_NAME = oradev)
    )
  )

ADR_BASE_LISTENER = /oracle/app/oracle
After we connect to the primary base and we check how many online redo groups and what size they are. Accordingly, we create as many standby logfiles with as many groups as we have plus one with the size of the redo log groups:
sqlplus / as sysdba
select group#,bytes/1024/1024 from v$log;
In our case we have three redo groups of 200mb so we make four of 200mb:
ALTER DATABASE ADD STANDBY LOGFILE ('/oracle/oradata/ORADEV/standby_redo01.log') SIZE 200M;
ALTER DATABASE ADD STANDBY LOGFILE ('/oracle/oradata/ORADEV/standby_redo02.log') SIZE 200M;
ALTER DATABASE ADD STANDBY LOGFILE ('/oracle/oradata/ORADEV/standby_redo03.log') SIZE 200M;
ALTER DATABASE ADD STANDBY LOGFILE ('/oracle/oradata/ORADEV/standby_redo04.log') SIZE 200M;
Then we activate and change the following parameters in the primary:
- Enable force logging.
- Activation of the flashback (so that after a failover the database is created by itself without the need to restore).
- Set flashback retention in minutes and size as large as possible for the above.
- Activation of remote login in the password file.
- Activation of the broker.
- Definition of log_archive_config with the two tnsnames, will be needed if we want to have Data Guard in Maximum Availability mode. (it is optional).
- Activation of standby_file_management in auto, so that any file we create in our primary base is also created in the standby automatically.
- Definition of the local_listener with the hostname and the default port to make the services auto register.
ALTER DATABASE FORCE LOGGING;

ALTER SYSTEM SWITCH LOGFILE;

ALTER DATABASE FLASHBACK ON;

ALTER SYSTEM SET DB_FLASHBACK_RETENTION_TARGET = 2880;

ALTER SYSTEM SET DB_RECOVERY_FILE_DEST_SIZE = 20G SCOPE=BOTH;

ALTER SYSTEM SET REMOTE_LOGIN_PASSWORDFILE=EXCLUSIVE SCOPE=BOTH;

ALTER SYSTEM SET DG_BROKER_START=TRUE;

ALTER SYSTEM SET log_archive_config='DG_CONFIG=(ORADEV,ORADEVDR)' SCOPE=BOTH;

ALTER SYSTEM SET STANDBY_FILE_MANAGEMENT=AUTO;

ALTER SYSTEM SET LOCAL_LISTENER='(ADDRESS=(PROTOCOL=tcp)(HOST=oracledev1)(PORT=1521))' SCOPE=BOTH;

exit;
The creation of the standby database
To create standby on standby server (oracledev2), we export it SID with the name of the instance and we build it pfile which we will need to make the base:
export ORACLE_SID=oradev

vi $ORACLE_HOME/dbs/initORADEVDR.ora
In the pfile we put only the base name (instance_number is for RAC):
*.db_name='oradev'
*.instance_number='1'
Then we create the central folders where our database files will go if they don't already exist:
mkdir -p /oracle/oradata/
mkdir -p /oracle/fast_recovery_area/
mkdir -p /oracle/app/oracle/admin/oradev/adump

chown -R oracle:oinstall /oracle
chmod -R 775 /oracle
We'll need to make one password file to be able to connect one base to another:
orapwd file=$ORACLE_HOME/dbs/orapworadev password="Kwdikos1!" entries=10 force=y
We connect with sqlplus to our standby and start the database in nomount with the pfile we created earlier:
sqlplus / as sysdba
startup nomount pfile='$ORACLE_HOME/dbs/initORADEVDR.ora';
To transfer the base from primary to standby is done very easily by using it RMAN Duplicate.
To do this we will connect to the RMAN tool from standby with as TARGET the primary basis and as AUXILIARY the standby with the code we gave in the password file:
rman TARGET "sys/Kwdikos1!"@ORADEV AUXILIARY "sys/Kwdikos1!"@ORADEVDR;
After connecting we run the following script, in this we set the db_unique_name which must be different from the primary (oradevdr), the local_listener with the local hostname (oracledev2) and we can, if we want, change the names of the folders where our files coming from the primary will go (the subfolders will be created by itself).
DUPLICATE TARGET DATABASE
  FOR STANDBY
  FROM ACTIVE DATABASE
  DORECOVER
  SPFILE
    SET db_unique_name='oradevdr' COMMENT 'Is standby'
    SET log_archive_dest_2=''
    SET db_file_name_convert='/oracle/oradata/ORADEV/','/oracle/oradata/ORADEVDR/'
    SET control_files='/oracle/oradata/ORADEVDR/control01.ctl','/oracle/fast_recovery_area/ORADEVDR/control02.ctl'
    SET local_listener='(ADDRESS=(PROTOCOL=tcp)(HOST=oracledev2)(PORT=1521))'
    SET log_file_name_convert='/oracle/oradata/ORADEV/','/oracle/oradata/ORADEVDR/'
    SET log_archive_dest_1='location=/oracle/fast_recovery_area/ORADEVDR/archivelog/'
##log_archive_dest_1='location=USE_DB_RECOVERY_FILE_DEST'
##  SET log_archive_config=''
  NOFILENAMECHECK;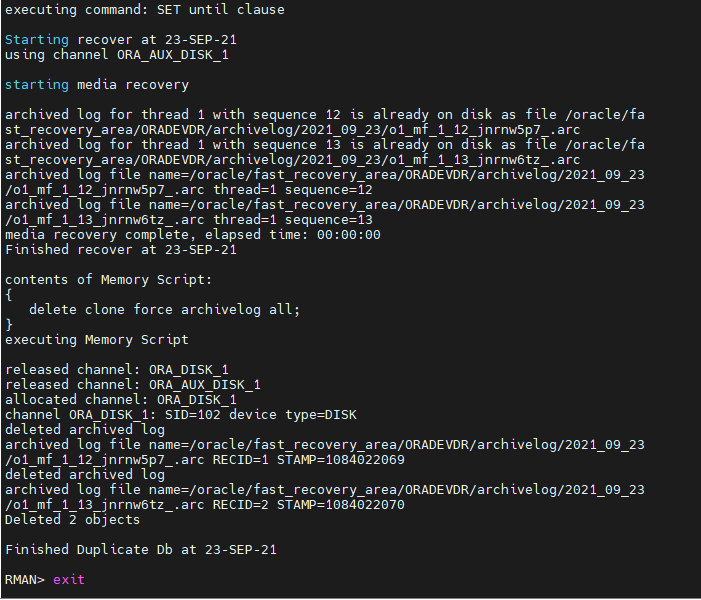
After it is completed, we connect to the standby base that was just created and activate the flashback and the broker there as well as we did in the primary:
sqlplus / as sysdba
ALTER DATABASE FLASHBACK ON;

ALTER SYSTEM SET DB_FLASHBACK_RETENTION_TARGET = 2880;

ALTER SYSTEM SET DB_RECOVERY_FILE_DEST_SIZE = 20G SCOPE=BOTH;

ALTER SYSTEM SET DG_BROKER_START=TRUE;
Enabling Data Guard
It's time to enable Data Guard through the broker.
We connect to primary:
dgmgrl "sys/Kwdikos1!"@ORADEV
We make the configuration by adding the primary:
create configuration dg_config as primary database is oradev connect identifier is oradev;
Then we add the standby:
add database oradevdr as connect identifier is oradevdr maintained as physical;
And before activating it, check the configuration:
show configuration;
If we have a warning for slow transfer and apply of the logs because we can set it up like a lab, we can raise the threshold so that it does not show us warnings for fewer seconds:
edit database oradev set property 'TransportLagThreshold'='90';
edit database oradevdr set property 'TransportLagThreshold'='90';

edit database oradev set property 'TransportDisconnectedThreshold'='90';
edit database oradevdr set property 'TransportDisconnectedThreshold'='90';

edit database oradev set property 'ApplyLagThreshold'='90';
edit database oradevdr set property 'ApplyLagThreshold'='90';
If everything is ok, activate the configuration:
enable configuration;
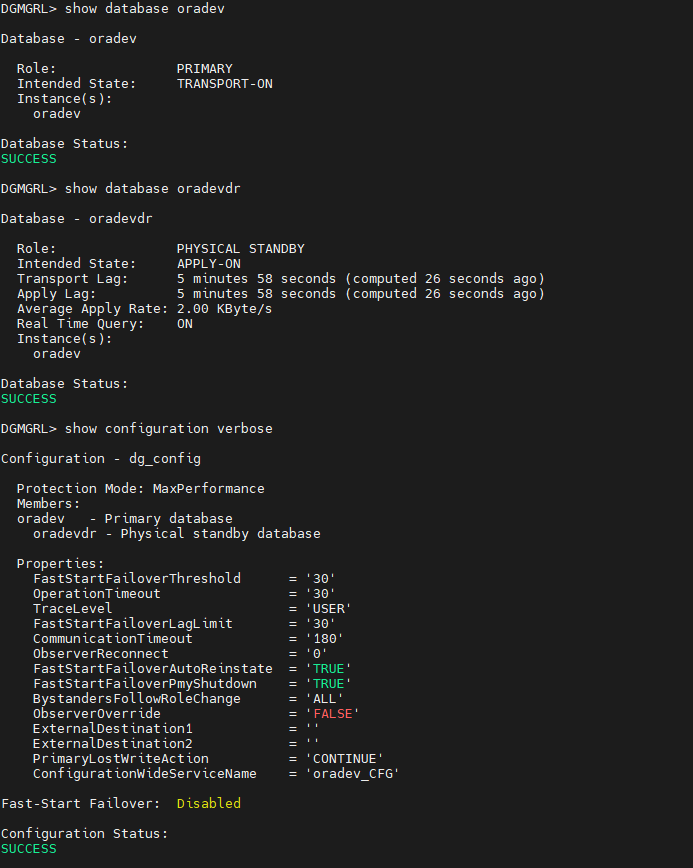
With the following commands we can see the status of the databases and the configuration:
show database oradev;

show database oradevdr;

show configuration verbose;
How do we delete archivelogs from standby?
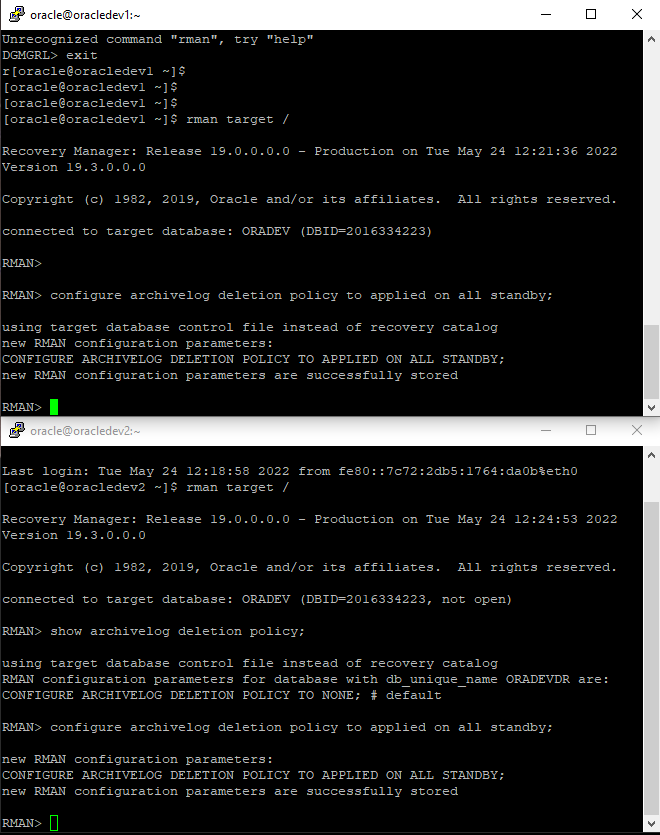
In order to automatically delete archivelogs that have been applied to standby, we must go to RMAN on both servers and change the policy with the following steps.
*On each server it will keep the archivelogs it needs to keep the retention window we have defined.
We connect to RMAN:
rman target /
We change the parameter:
CONFIGURE ARCHIVELOG DELETION POLICY TO APPLIED ON ALL STANDBY;
We can also change the retention policy by adjusting how many days it will keep them:
CONFIGURE RETENTION POLICY TO RECOVERY WINDOW OF 7 DAYS;
We do the same process for the second server.
Activation of Active Data Guard for read access on standby
To be able to run select in physical standby we should activate it Active Data Guard. The process is very simple but Oracle gives it as an extra license which means increased costs.
To activate it we connect to the standby (oracledev2):
sqlplus / a sysdba
shutdown immediate;

startup mount;

alter database open read only;

alter database recover managed standby database using current logfile disconnect from session;
Then to see that it has definitely been activated as it should, we run the following query which should appear OPEN_MODE: READ ONLY WITH APPLY:
select open_mode from v$database;
Testing Data Guard
Now if we make a table with entries in the primary:
create table users (id int,name varchar(20));
insert into users values (1,'Nikos');
insert into users values (2,'Giorgos');
insert into users values (3,'Stratos');
commit;
And if we select from the standby, we will see that they have passed there immediately:
select id,name,(select db_unique_name||' ' ||database_role from v$database) as UniqueName_And_Role from users;
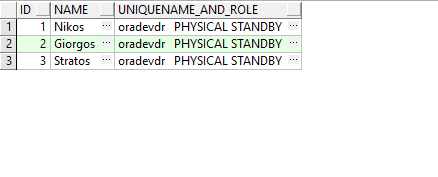
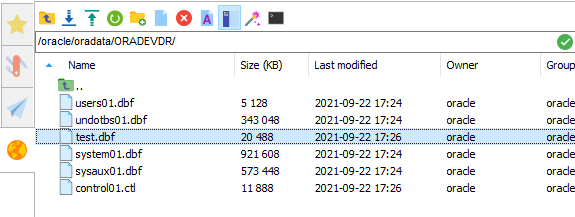
If we try to create a file in our primary, we will see that it will automatically be created in the standby as well:
create tablespace test datafile '/oracle/oradata/ORADEV/test.dbf' size 20m online;
How do we switchover to standby?
To turn the standby base into primary, all we have to do is switchover through the broker:
dgmgrl "sys/Kwdikos1!"@ORADEV
switchover to oradevdr
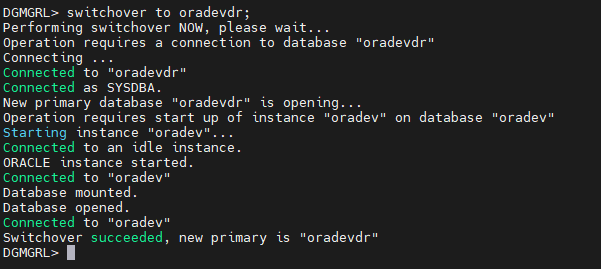
Once completed, we will see that standby has become primary and the primary standby:
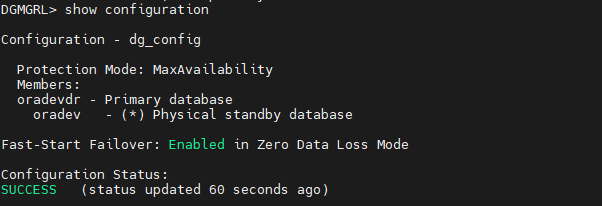
Then we can go back with another switchover:
switchover to oradev
How do we force failover on standby
In case we have lost communication with our primary, we can force failover so that our standby becomes primary:
dgmgrl "sys/Kwdikos1!"@ORADEVDR
failover to oradevdr
But when the database comes back and we see the configuration from the broker, we will see that the physical standby is disabled and that the database that was the former primary should become reset:
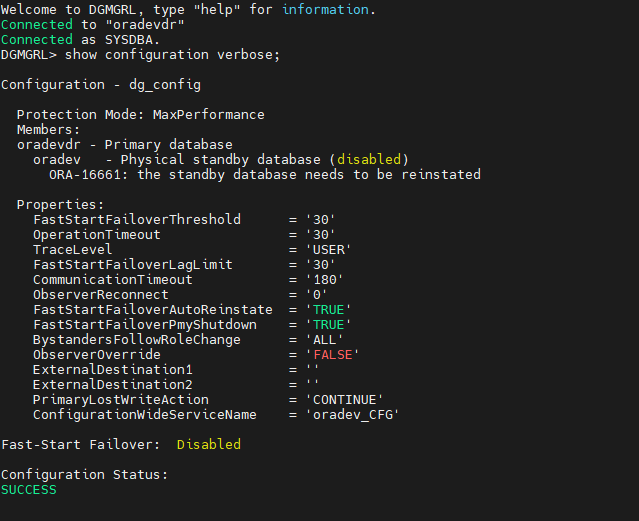
How to restore the primary base after failover
To build it, we must first connect to the primary and manually convert it to physical standby:
sqlplus / as sysdba
alter database convert to physical standby;

shutdown immediate;

startup mount;
Then through the broker we reset it:
dgmgrl "sys/Kwdikos1!"@ORADEVDR
reinstate database oradev
How do we make a standby snapshot for testing?
We can if we want to convert the standby base to snapshot standby which has the read-write capability. So we can do tests on new releases that we want to run on the base and then turn the base to physical standby by reverting the changes. However, we should know that as long as the base is snapshot standby, it is not updated.
So we connect to the standby base:
dgmgrl "sys/Kwdikos1!"@ORADEVDR
And we convert it to Snapshot Standby:
convert database oradevdr to snapshot standby;
exit;
When the change is complete we can try passing changes to a table:
insert into users values (4,'Maria');
commit;

select id,name,(select db_unique_name||'   ' ||database_role from v$database) as UniqueName_And_Role from users;
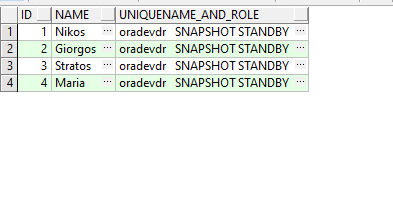
And as soon as we turn the base to physical standby we will see that these changes have been lost:
dgmgrl "sys/Kwdikos1!"@ORADEV
convert database oradevdr to physical standby;
exit;
select id,name,(select db_unique_name||' ' ||database_role from v$database) as UniqueName_And_Role from users;

Useful monitoring queries
By running the following query on the primary, we see the difference in the sent and applied logs between the primary and the standby:
SELECT
ARCS.DEST_ID,
LAST_SEQUENCE_RECEIVED,
LAST_SEQUENCE_APPLIED,
LAST_SEQUENCE_RECEIVED-MAX_SEQUENCE RECEIVED_DIFFERENCE,
LAST_SEQUENCE_APPLIED-LAST_SEQUENCE_RECEIVED APPLIED_DIFFERENCE
FROM
(SELECT DEST_ID, max(SEQUENCE#) LAST_SEQUENCE_RECEIVED
FROM V$ARCHIVED_LOG where resetlogs_change#=(select resetlogs_change# from v$database)
GROUP BY DEST_ID) ARCS
LEFT JOIN
(SELECT DEST_ID, max(SEQUENCE#) LAST_SEQUENCE_APPLIED
FROM V$ARCHIVED_LOG
where APPLIED='YES' AND DEST_ID not in (0,1) and resetlogs_change#=(select resetlogs_change# from v$database)
GROUP BY DEST_ID
UNION
SELECT 1 DEST_ID,max(SEQUENCE#) LAST_SEQUENCE_APPLIED
FROM V$LOG_HISTORY
where resetlogs_change#=(select resetlogs_change# from v$database)
) APPLIED ON APPLIED.DEST_ID=ARCS.DEST_ID
,
(SELECT max(SEQUENCE#) MAX_SEQUENCE
FROM V$LOG_HISTORY
where resetlogs_change#=(select resetlogs_change# from v$database))MAX
WHERE 1=1
--and LAST_SEQUENCE_RECEIVED-MAX_SEQUENCE < -1
--or LAST_SEQUENCE_APPLIED-LAST_SEQUENCE_RECEIVED < -1
;

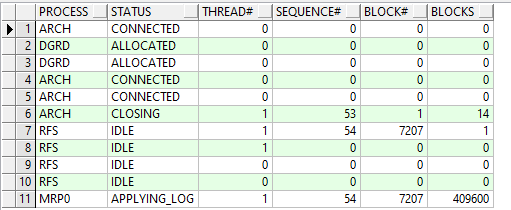
With the following query on standby we see what status the logs are in (APPLYING_LOG):
select process, status, thread#, sequence#, block#, blocks
  from gv$managed_standby; #APPLYING_LOG / WRITING
Some useful information about the base can be seen through the broker:
show database verbose 'ORADEVDR';

show database 'ORADEVDR' statusreport;

show database verbose 'ORADEVDR' LogXptStatus;

show database verbose 'ORADEVDR' InconsistentLogXptProps
How do we stop Data Guard?
If we want to stop the transport or the apply of the logs, we can do the following:
edit database oradev set state='TRANSPORT-OFF';

edit database oradev set state='TRANSPORT-ON';

edit database oradevdr set state='APPLY-OFF';

edit database oradevdr set state='APPLY-ON';
If we want to remove Data Guard completely then:
dgmgrl "sys/Kwdikos1!"@ORADEV
disable configuration;
remove configuration;
exit;
sqplus / as sysdba
alter system set dg_broker_start=false;


I have gone through your articles but I found this is one of the most useful...to me thanks brother
Honestly, this is one of the best written online blogs I have found, well done!
I have a mantra "If you didn't document it you didn't do it".
Any DBA could take this one BLOG, understand what and why they were doing each step.
Plus it is the whole solution in one spot.