How do we create a Group Managed Service in Active Directory to pick up the SQL Server service without using a password
- How to convert a database from Physical Standby to Logical Standby in Oracle Data Guard - 2 June 2025
- How to roll back an Oracle Database using a restore point in a Data Guard environment - 28 April 2025
- How can we increase performance on Oracle GoldenGate Replicat target with parallelism? - 19 March 2025
To SQL Server we have to change the user that "raises" the SQL Server service from the Windows default to someone with specific rights that belongs to the Active Directory Domain. In this article we will see how we can create one Group Managed Service which will allow us to control these accounts en masse and not have the need to use a password for each one.
The installation
The actions required on the Active Directory Domain Controller
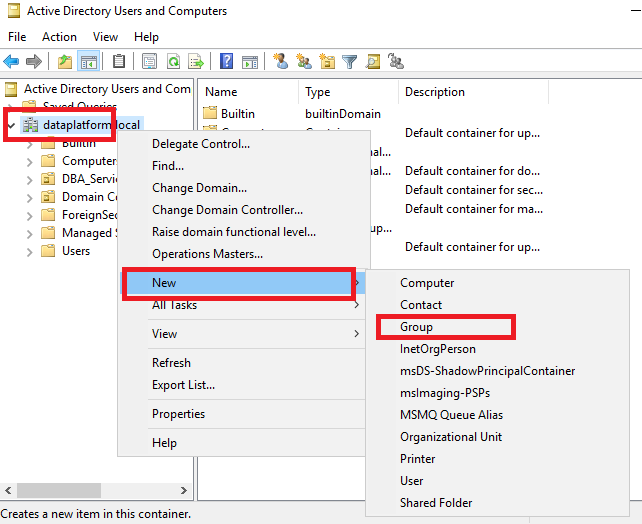
To create the Security Group we connect to the server that has the Active Directory Controller, go to Active Directory Users and Computers, right click on domain, New, Group:
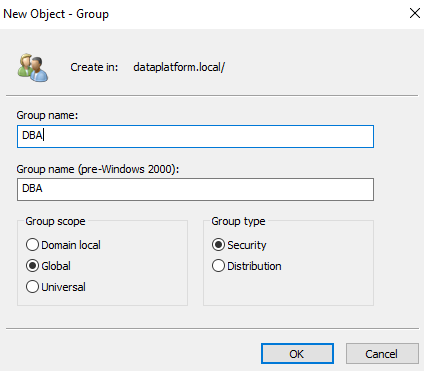
We assign a name to the Group:
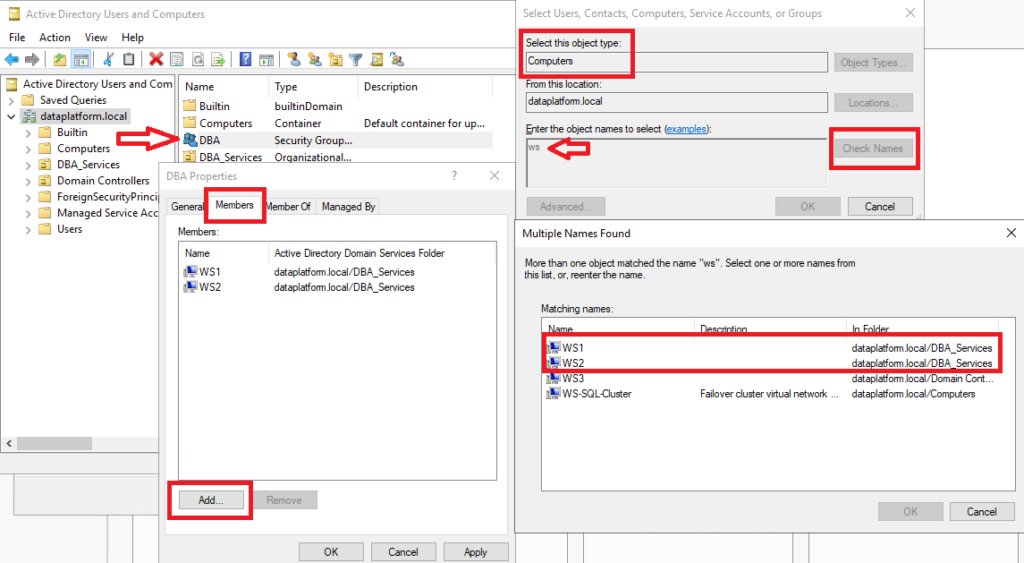
Then we choose right click on the Group we made, Members, Add…, as object type we define Computers, as location the Domain, the names of the servers that the managed services will use and finally we choose Check Names:
Next we need to make a key for the distribution service (KDS). We will be able to use this key after 10 hours. For the key to be created and to be effective immediately, run the following command at PowerShell:
Add-KdsRootKey -EffectiveTime ((Get-Date).AddHours(-10))
To see that it was created normally, run the following:
Get-KdsRootKey
AttributeOfWrongFormat :
KeyValue               : {197, 92, 95, 225...}
EffectiveTime          : 5/10/2021 4:03:28 πμ
CreationTime           : 5/10/2021 2:03:28 μμ
IsFormatValid          : True
DomainController       : CN=WS3,OU=Domain Controllers,DC=dataplatform,DC=local
ServerConfiguration    : Microsoft.KeyDistributionService.Cmdlets.KdsServerConfiguration
KeyId                  : beffa3be-d2e1-989b-d545-03706e73906e
VersionNumber          : 1
To create the Group Managed Service run the following command setting:
- name: The name we want the managed service to have.
- DNSHostName: The DNS hostname.
- PrincipalsAllowedToRetrieveManagedPassword: The name of the Group we created.
New-ADServiceAccount -name sqlserverserv -DNSHostName ws3.dataplatform.local -PrincipalsAllowedToRetrieveManagedPassword DBA
Also so that we don't receive messages about his registration Service Principal Name (SPN) we should allow the service account to be able to register itself with the following command:
dsacls (Get-ADServiceAccount -Identity sqlserverserv ).DistinguishedName /G "SELF:RPWP;servicePrincipalName"
The actions required on the SQL Servers servers
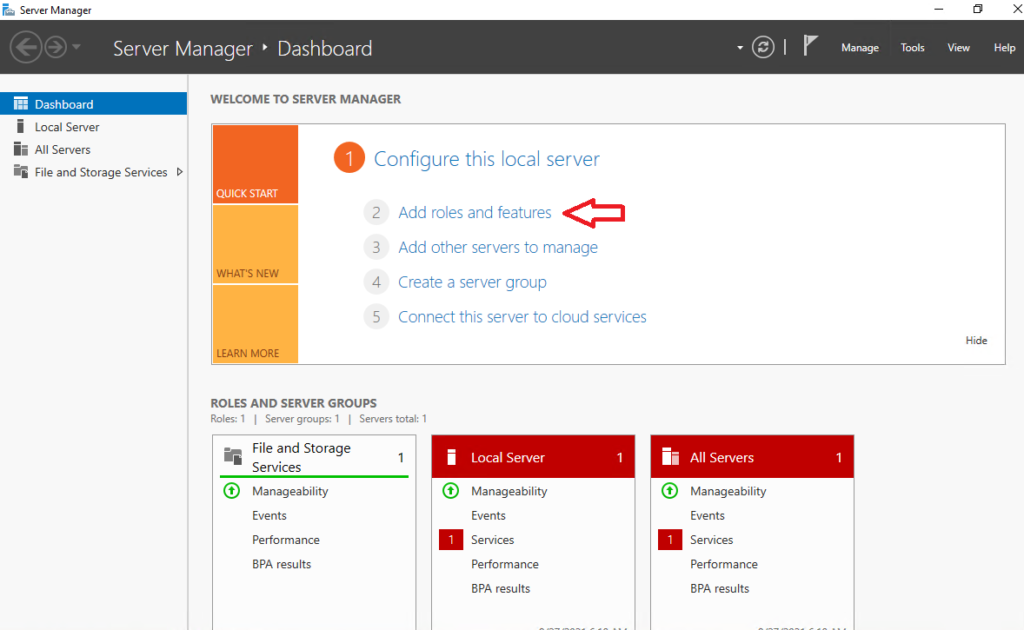
To begin with, we should connect to the SQL Servers and install the feature AD DS and AD LDS Tools. To do this we go to Server Manager and we choose Add roles and features:
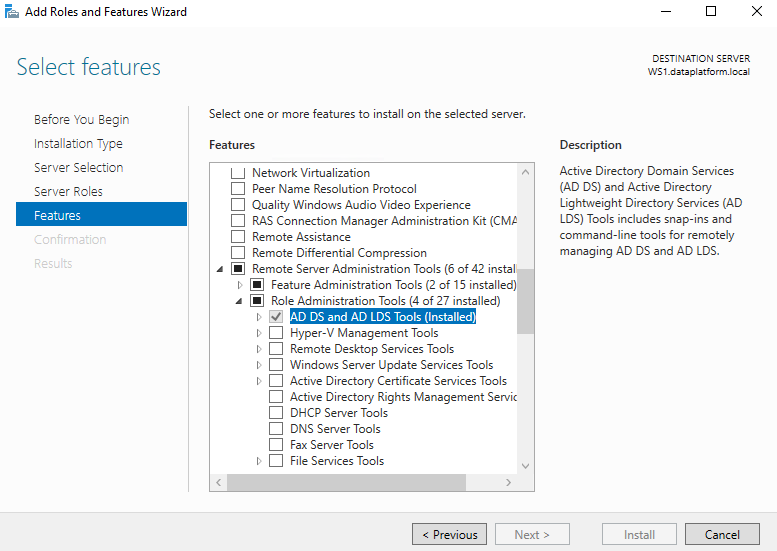
Then on the tab Features below the selection Remote Server Administration Tools and Role Administration Tools we will find to choose it AD DS and AD LDS Tools :
After the installation is complete we run the following command in PowerShell specifying its name Managed Service which we made before:
Install-ADServiceAccount sqlserverserv
To test if it works, run the following:
Test-ADServiceAccount sqlserverserv
TrueNow it is ready and we have to go to change it in the SQL Server service.
Let's go to SQL Server Configuration Manager , select SQL Server Service, right click on SQL Server, select the tab Log On, This account, Browse, as Object Type we define Service Account, as Location we define Entire Directory and put the name of the server Check Names:
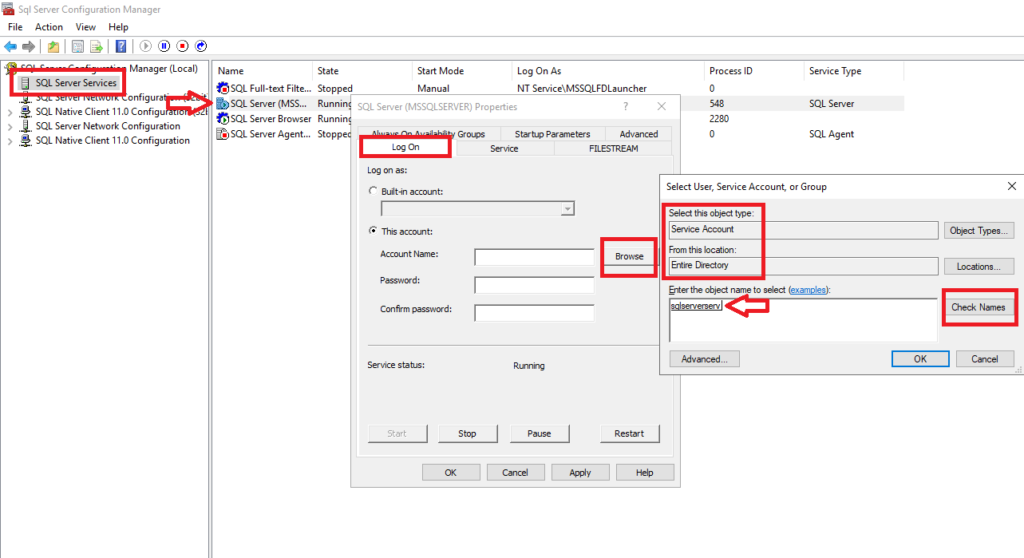
After restarting the service, we will see that it has received the new managed service successfully:


