

How we can schedule jobs on Azure SQL Databases using Elastic Database Jobs

Certifications:
As we know in Azure SQL Databases there is no SQL Server Agent, which means we can't run scheduled tasks through it. Nevertheless on Azure SQL Databases we can schedule jobs in many other ways such as using Azure Data Factory, Elastic Database Jobs and Logic Apps.
In previous article we had seen how they work Logic Apps. In Logic Apps, however, we have to connect one by one and create a workflow for each case.
In this article we will see how we use them Elastic Database Jobs. In contrast to the Logic Apps Job execution can be done from a single base to a group of bases. Also the creation, management and monitoring of Jobs is done with code Transact SQL.
Specifically, we will see how to create a Job that will run once a week Rebuild the Indexes in all bases of a target group that we have defined.
The example
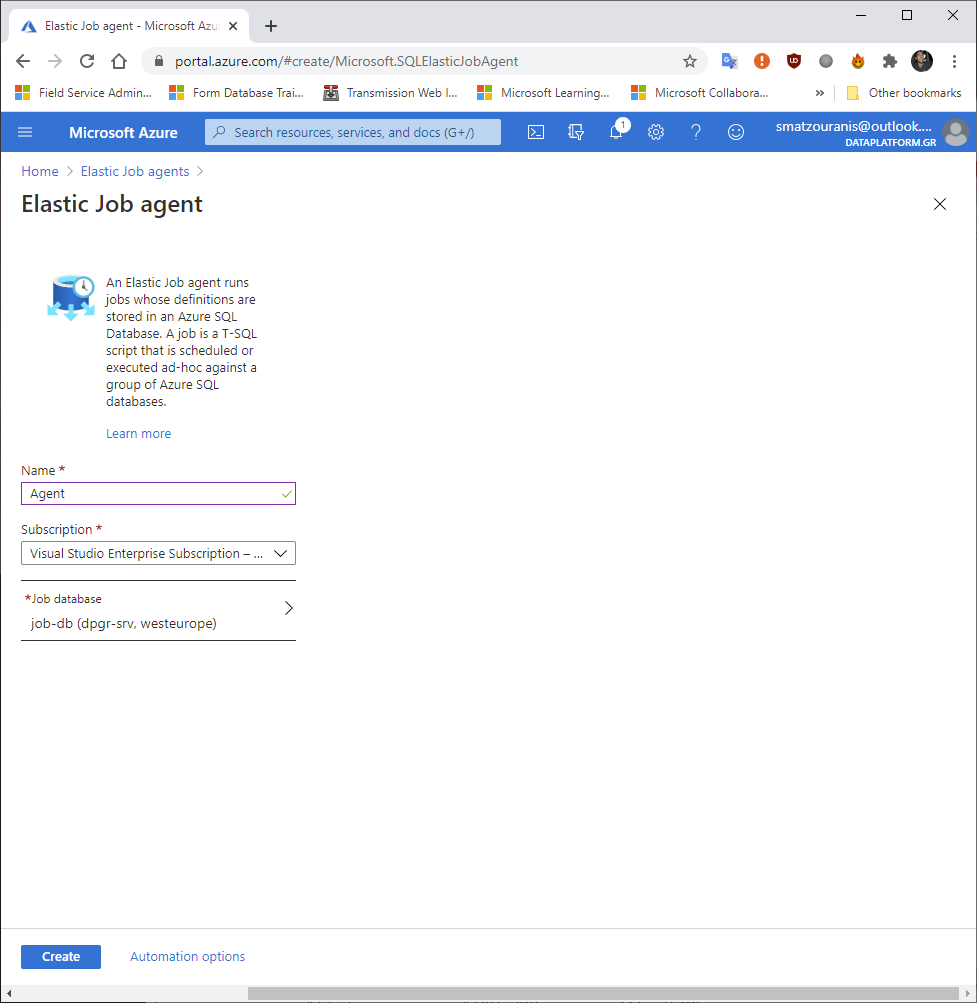
To begin with, we connect to Azure Portal. Like prerequisite is to have created an Azure SQL Database*which will manage all the Jobs and will be the one who will "click" on the Elastic Job agent (if we don't know how to make a base we see it here).
*The job db should be made in a basic DTU model and is always online and does not require high resources. Its cost in this case is quite low ~ 4 euros per month.
Then we look for the service Elastic Job agents.
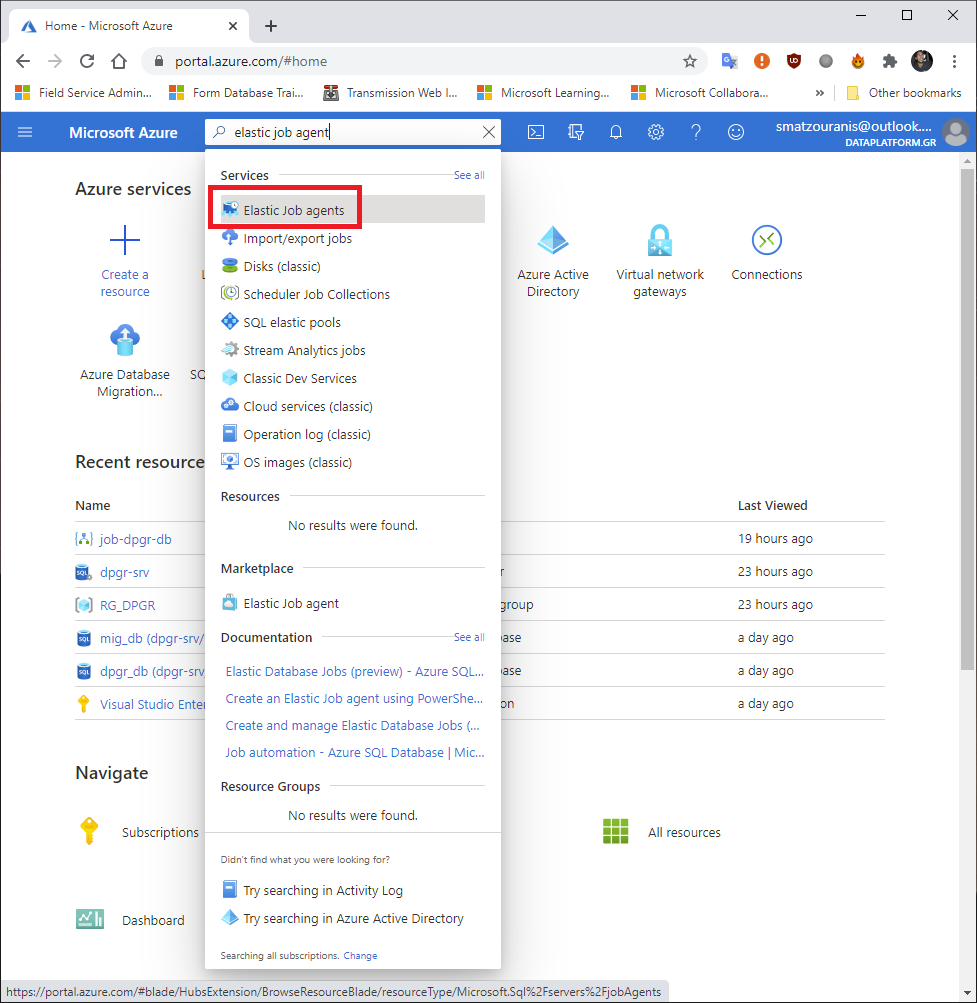
Here we should define the name of the Agent and as Job database her Azure SQL Database that we have built that will manage the Jobs.
The next step requires a little attention to understand the logic.
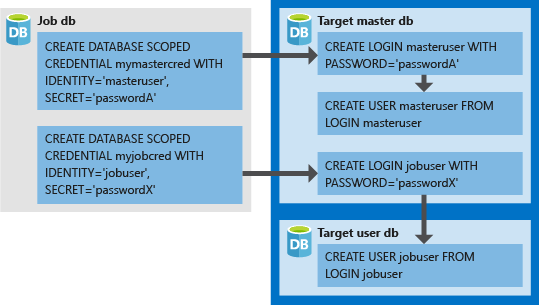
We should create two credentials in the Job db, which, however, will not be for the database itself but for external use towards the rest (scoped credential).
We will create these two credentials as logins in master db on the hosting logical Server Azure SQL Databases. Also, after creating the login for the master db, we should also create the user in it.
Finally, we will have to connect to each of the bases that the Server contains and that's it create the user from the user login we created in the master db.
So we open one SQL Server Management Studio ή Azure Data Studio and we create them.
To begin with, we connect to Job db to make them scoped credentials:
USE [job-db]
GO
--Connect to the job database specified when creating the job agent

-- Create a db master key if one does not already exist, using your own password.
CREATE MASTER KEY ENCRYPTION BY PASSWORD='Patatakia1!';

-- Create a database scoped credential.
CREATE DATABASE SCOPED CREDENTIAL myjobcred WITH IDENTITY = 'myjobcred',
    SECRET = 'userpass1!';
GO

-- Create a database scoped credential for the master database of server1.
CREATE DATABASE SCOPED CREDENTIAL mymastercred WITH IDENTITY = 'mymastercred',
    SECRET = 'masterpass1!';
GO
Then we connect to master db of logical Server which hosts the Azure SQL Databases to create the logins and the user in the master db:
-- At the target server containing the Databases
USE [master]
GO

CREATE LOGIN mymastercred with password = 'masterpass1!';
GO
CREATE USER mymastercred FROM LOGIN mymastercred;
GO
CREATE LOGIN myjobcred with password = 'userpass1!';
GO
Finally we connect separately to each base you contain on the target Server and we will create the user from the login.
However, since I want to rebuild indexes, I will also give the right required to the user to complete the process. I mean db_ddladmin and view database state:
USE [dpgr_db]
GO
CREATE user myjobcred  FOR LOGIN myjobcred;
GO
ALTER ROLE db_ddladmin ADD MEMBER myjobcred;
GO
GRANT VIEW DATABASE STATE TO myjobcred;
GO

USE [mig_db]
GO
CREATE user myjobcred  FOR LOGIN myjobcred;
GO
ALTER ROLE db_ddladmin ADD MEMBER myjobcred;
GO
GRANT VIEW DATABASE STATE TO myjobcred;
GO

USE [job-db]
GO
CREATE user myjobcred  FOR LOGIN myjobcred;
GO
ALTER ROLE db_ddladmin ADD MEMBER myjobcred;
GO
GRANT VIEW DATABASE STATE TO myjobcred;
GO
After we're done with the users we go back to the job-db and it's time to build it target group . The target group is the group of databases where the Job will be executed.
In our case, we want it to run on as many bases as exist on the specific logical server.
USE [job-db]
GO

EXEC jobs.sp_add_target_group 'ServerGroup1';
GO

-- Add a server target member
EXEC jobs.sp_add_target_group_member
'ServerGroup1',
@target_type = 'SqlServer',
@refresh_credential_name='mymastercred', --credential required to refresh the databases in a server
@server_name='dpgr-srv.database.windows.net';
GO

SELECT * FROM jobs.target_groups WHERE target_group_name='ServerGroup1';
SELECT * FROM jobs.target_group_members WHERE target_group_name='ServerGroup1';
We see with the results of the selects that they were created successfully.

In the next step we create the Job in Job db.
We should remember that the time he accepts it is in UTC time zone so for Greek time we should do -2 or -3 hours on the date we set (in our case I do it with the function DATEADD).
Also in the parameter schedule_interval_type we defineWeeks' with schedule_interval_count 1 to run once a week. As schedule_start_time is the date it will run for the first time.
--Connect to the job database specified when creating the job agent

--Add job for create table

DECLARE
@date DATETIME2;
set @date = DATEADD(HOUR,-2,'20201226 04:00:00'); -- I am using DATEADD because it works on UTC time zone, but Greece has gmt+2 /+3.

EXEC jobs.sp_add_job @job_name='Rebuild Indexes'
,@description='Rebuild Indexes'
,@Enabled = 1
,@schedule_interval_type  = 'Weeks'
,@schedule_interval_count  = 1
,@schedule_start_time  = @date;

/* for schedule_interval_type the options
'Once',
'Minutes',
'Hours',
'Days',
'Weeks',
'Months'
*/
After we have created and scheduled the Job, we need to add the job step in the job that will have the code we want to run (in the parameter command). In our case, the rebuild of the indexes.
We do not forget that we should define the target_group_name which we had also created the user credential in credential_name.
-- Add job step for create table
EXEC jobs.sp_add_jobstep @job_name='Rebuild Indexes',
@credential_name='myjobcred',
@target_group_name='ServerGroup1',
@step_name='run rebuild',
@command=N'
DECLARE @Indexes TABLE
   (
      ObjectSchema SYSNAME,
      ObjectName SYSNAME,
      IndexName SYSNAME,
      FragmentationPCT FLOAT,
      Command AS (REPLACE(REPLACE(REPLACE(N''ALTER INDEX {IndexName} ON {ObjectSchema}.{ObjectName} REBUILD;'',N''{IndexName}'',IndexName),N''{ObjectSchema}'',ObjectSchema),N''{ObjectName}'',ObjectName))
   )
;
INSERT INTO @Indexes
(
    ObjectSchema,
    ObjectName,
    IndexName,
    FragmentationPCT
)
SELECT QUOTENAME(SCHEMA_NAME(SO.schema_id)) AS ObjectSchema,
   QUOTENAME(SO.name) AS ObjectName,
   QUOTENAME(I.name) AS IndexName,
   IPS.avg_fragmentation_in_percent
FROM sys.dm_db_index_physical_stats(DB_ID(),NULL,NULL,NULL,N''Limited'') AS IPS
JOIN sys.objects AS SO ON SO.object_id = IPS.object_id
JOIN sys.indexes AS I ON I.index_id = IPS.index_id
   AND I.object_id = IPS.object_id
WHERE IPS.avg_fragmentation_in_percent > 15
ORDER BY IPS.avg_fragmentation_in_percent DESC
;

DECLARE @TsqlCommand NVARCHAR(MAX);

DECLARE IndexRebuilder CURSOR LOCAL FAST_FORWARD
   FOR
   SELECT I.Command
   FROM @Indexes AS I
;

OPEN IndexRebuilder

   FETCH NEXT FROM IndexRebuilder
   INTO @TsqlCommand
   ;

   WHILE @@FETCH_STATUS = 0
   BEGIN

      EXEC sp_executesql @Command = @TsqlCommand;

      FETCH NEXT FROM IndexRebuilder
      INTO @TsqlCommand
      ;
   END
CLOSE IndexRebuilder
DEALLOCATE IndexRebuilder
;'
We are ready to test. Now either we wait for it to run when we have scheduled it or we start it manually with the command:
--to run manually
exec jobs.sp_start_job 'Rebuild Indexes'
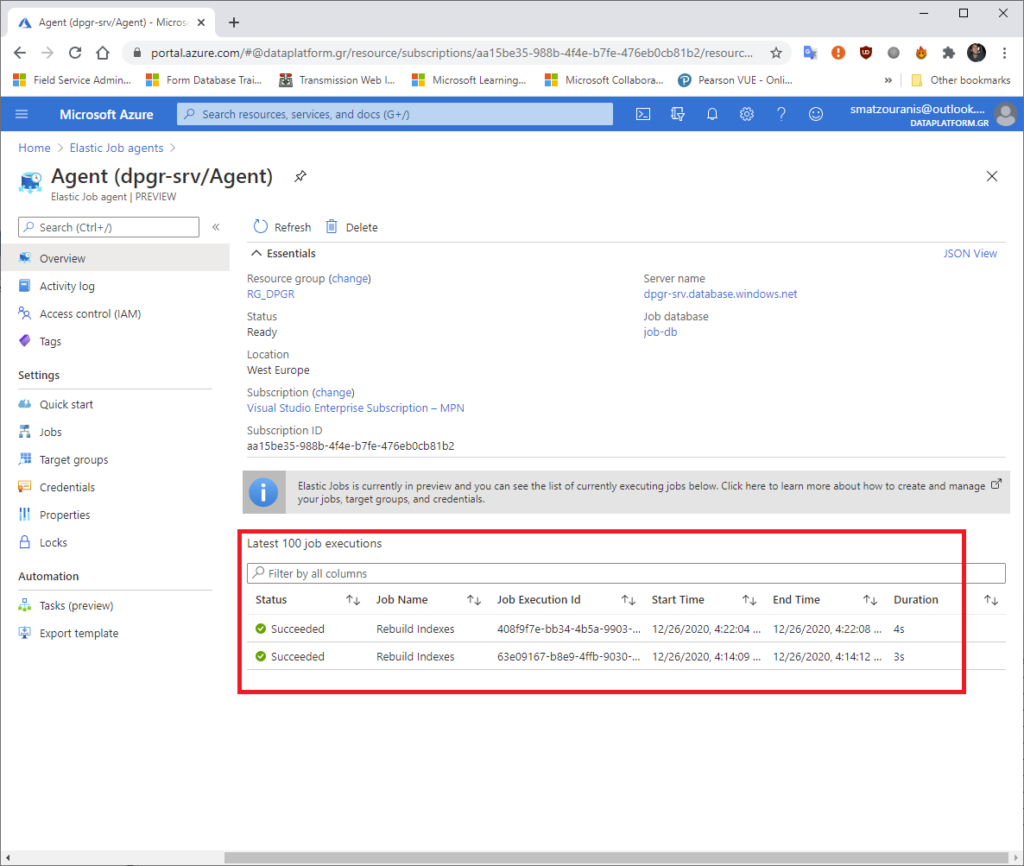
In the Agent service in the Azure Portal, we can see the execution history of the Jobs.
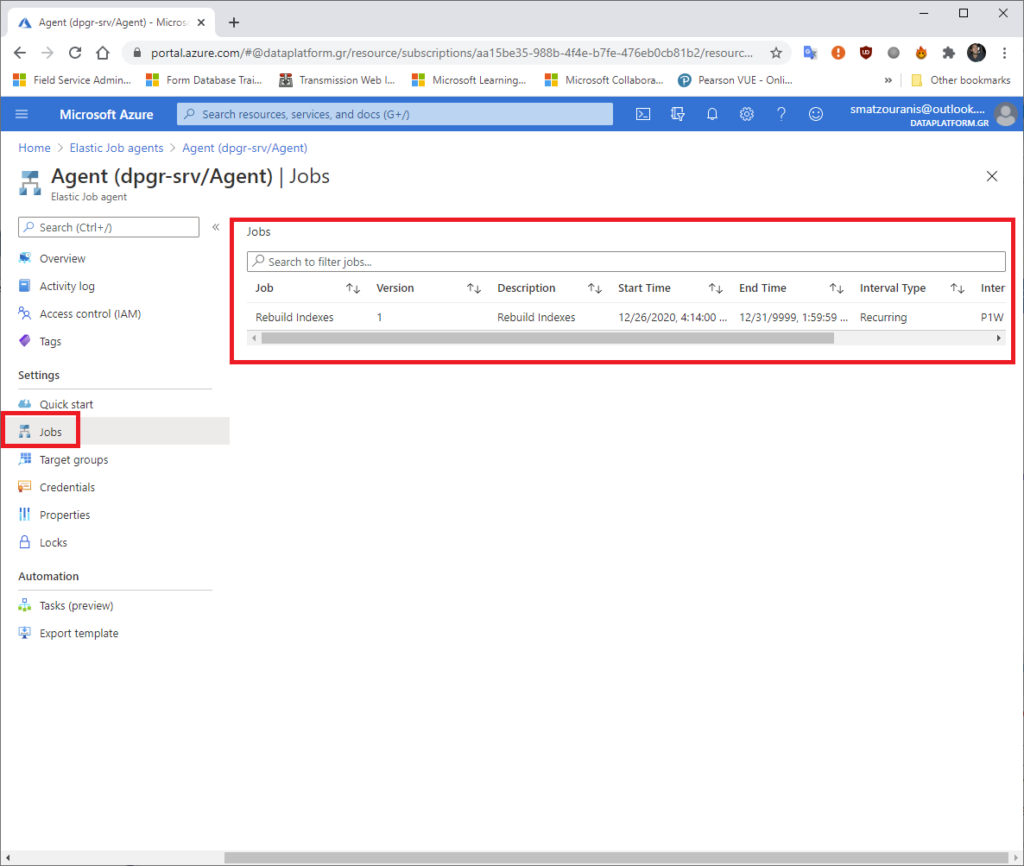
As also on the tab Jobs, the Jobs that exist.
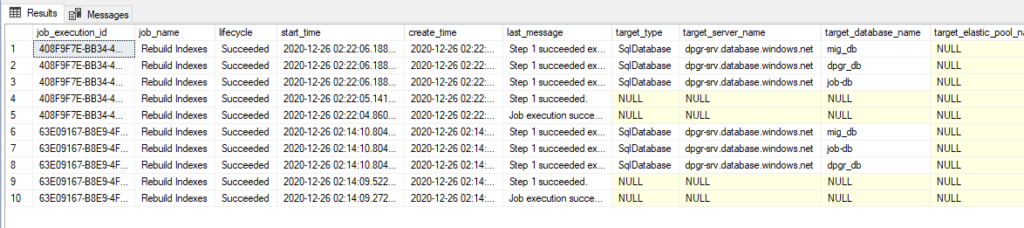
The same information can be seen with the T-SQL query in the Job db:
-- View all jobs executions
SELECT job_execution_id,job_name,lifecycle,start_time,create_time,last_message,target_type,target_server_name,target_database_name,target_elastic_pool_name,is_active FROM jobs.job_executions
ORDER BY start_time DESC
GO
If we want to stop a Job after finding first of the job_executions the job_execution_id, we can with the following query:
-- View all active executions to determine job execution id
SELECT * FROM jobs.job_executions
WHERE is_active = 1 AND job_name = 'Rebuild Indexes'
ORDER BY start_time DESC
GO

-- Cancel job execution with the specified job execution id
EXEC jobs.sp_stop_job 'D85DF748-F940-4FD3-AFB4-D7E892ABBDF4'
We can also delete the execution history of a Job or delete the entire Job.
--clean job history
EXEC jobs.sp_purge_jobhistory @job_name = 'Rebuild Indexes'

--delete the job
EXEC jobs.sp_delete_job @job_name='Rebuild Indexes'