How can we access another oracle database remotely
Certifications:

In this article we will analyze how we can access tables / views located in a remote database Oracle. To achieve this we need to create an object called Database Link.
Using Database Link we can call tables and views located in another database in queries by adding at the end “@” and the name of the Database Link. In addition to SELECT, we can also do INSERT, UPDATE, DELETE on these tables.
The preparation
First we need to go to the folder where the file is located tnsnames.ora on our local server. This file contains the network settings required for a user to connect to the Oracle database.
cd $ORACLE_HOME/network/admin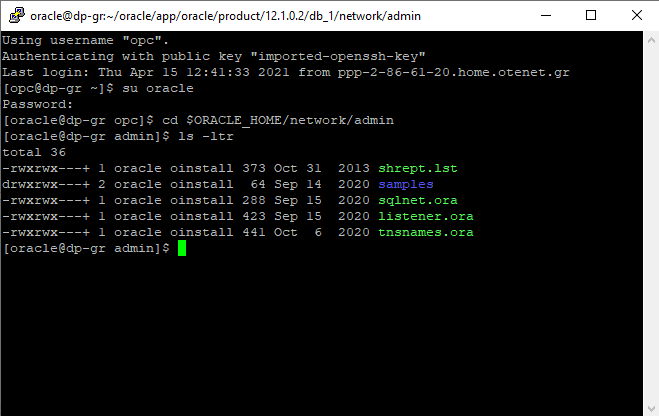
By editing the file, under the record for our current database (ORCL) we should also add a record for the remote one we want to connect to (REMOTEDB). There we should define Host,Port and as Service_name the name of the base / service we want to connect to.
*Because for the example I didn't have another instance I put a record with the same one.
vi $ORACLE_HOME/network/admin/tnsnames.ora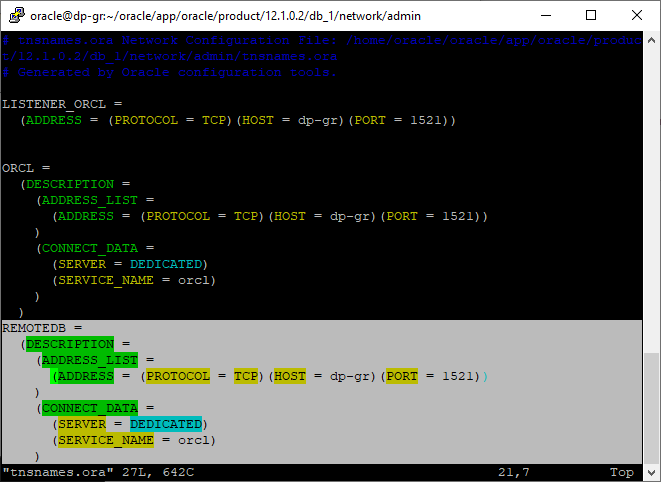
In the remote base, we should have created a user who will have the right to connect, along with any other right we want to see specific objects.
In our case we will give select permission to only one table:
-- Create the user
create user dblink_user
  identified by password
  default tablespace USERS
  temporary tablespace TEMP
  profile DEFAULT;
-- Grant/Revoke role privileges
grant connect to dblink_user;
grant resource to dblink_user;

grant select on scott.dept to dblink_user;
Create Public Database Link
In our local base we will create the Public Database Link. The Public means that it can be used by any user of the database.
It will be needed at connect to set the credentials of the user we made before on the remote base and on using the registration to tnsnames.ora which we added:
create public database link REMOTEDB
connect to dblink_user identified by password
using 'REMOTEDB';
--drop public database link REMOTEDB;
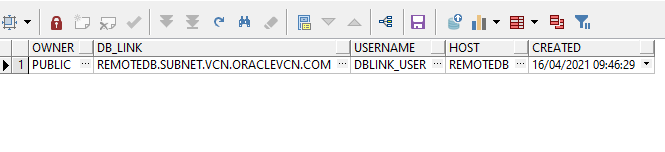
If we select the view dba_db_links, we will see the database link we made:
select * from dba_db_links;
We are ready to test the query on the table, all that is needed is after the name of the table to add "@" the name of the database link:
select * from scott.dept@REMOTEDB;

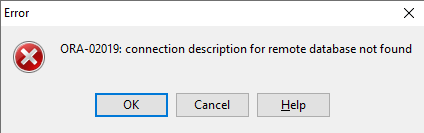
If we try to access another table that the remote user we made the database link to (dblink_user) does not have access to, then it will return an error:
select * from scott.bonus@REMOTEDB;
Create Private Database Link
However, since it is not safe for any user in a database to have access to a database link, we can create a database link that only works for a specific user.
For a start we should give the right CREATE DATABASE LINK to the user we want to use the database link:
grant CREATE DATABASE LINK to stratos;
Then we connect as this user (e.g. connect stratos/password) and create the database link as before without the word PUBLIC:
create database link REMOTEDB_FROM_STRATOS
connect to dblink_user identified by password
using 'REMOTEDB';
--drop database link REMOTEDB_FROM_STRATOS
If we now select the following view again with sysdba user we will see that we have two database links, one belongs to PUBLIC and the other to the user we created:
select * from dba_db_links;

So connected as this user if we run the query with his own database link it will work normally:
select * from scott.dept@REMOTEDB_FROM_STRATOS;
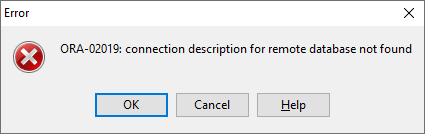
If we try to run the same query as any other user, we will get the error with the following message: