

How to properly install SQL Server
Certifications:
In this article we will analyze how a new installation should be done SQL Server step by step. Specifically we will see the setup for SQL Server 2019. We will also see what we need to have done before starting the installation and what we need to pay attention to in order to have as much security and performance as possible.
Prerequisites
We should download the setup to install SQL Server 2019. We find it directly from Microsoft here.
For installation we will need one local admin account with which we will connect before running the setup.
As a minimum, it should have the following rights:
- Act as part of the operating system
- Backup Files & Directories
- Debug Programs
- Manage Auditing & Security Log
To bring up the Database Engine and Agent services we will need Active Directory Domain Service Account ή Managed Service Account with the following rights:
- Act as part of the operating system
- Lock Pages in Memory
- Perform Volume Maintenance Tasks
- Bypass Traverse Checking
- Replace A Process Level Token
- Adjust Memory Quotas For A Process
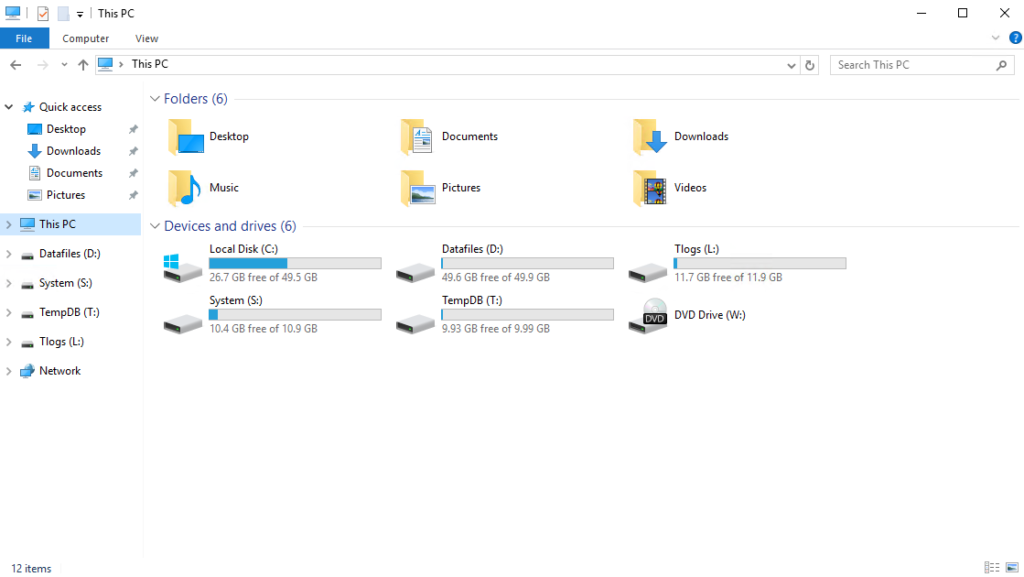
We will also need separate disks that will help us in the management and depending on what storage we have maybe also in the performance.
The disks should be partitioned as follows:
- In the C drive will be the installation other than the SQL Server OS and binaries.
- In the D drive we will have the datafiles of the user databases and if we don't have a separate disk for the backups we can also put them in a folder there (usually we transfer the backups to a backup server so we don't always need a separate disk on the machine itself).
- In the L drive we will have the transaction log files.
- In the S drive we will have the files of the system databases (master, msdb, model).
- In the T drive we will have the files of the system database TempDB which is recreated every time the SQL Server instance starts.
The installation
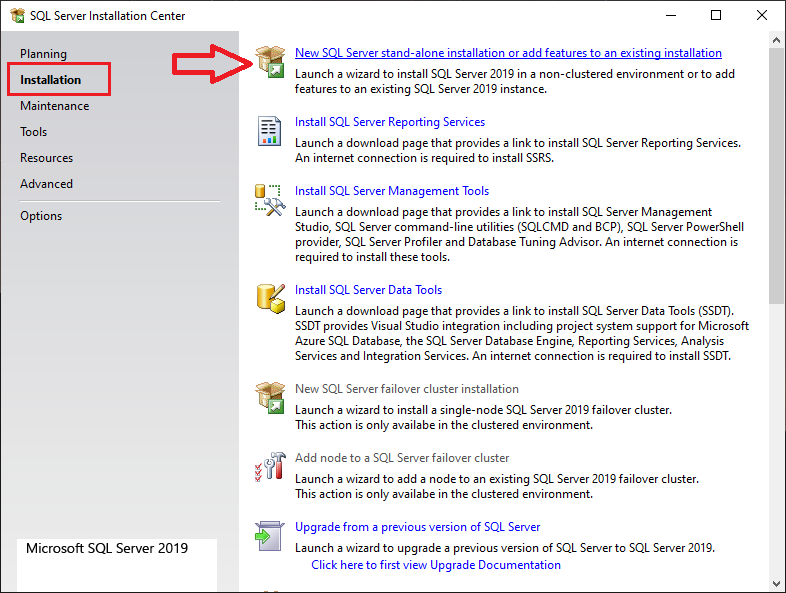
Starting the setup we will go to the tab Installation and we will choose the first option New SQL Server stand-alone installation or add features to an existing installation.
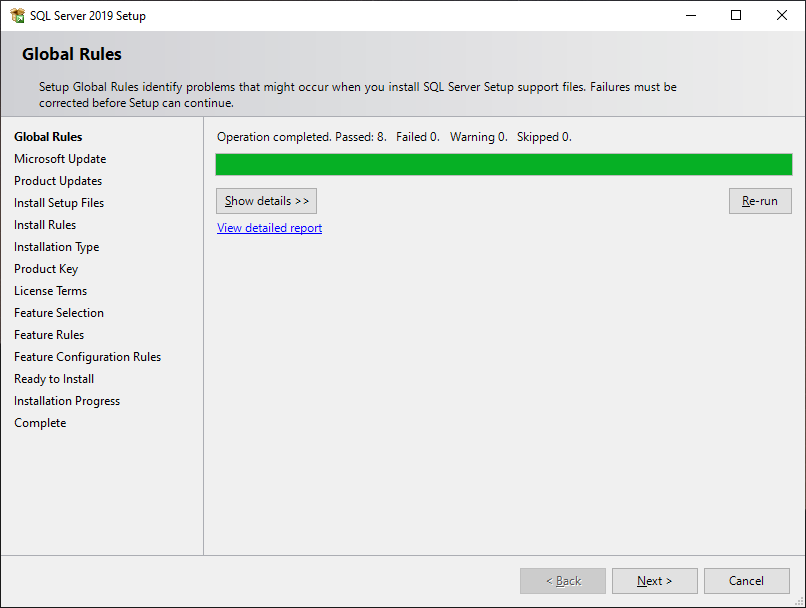
On the next screen, wait for the checks to be OK and press OK.
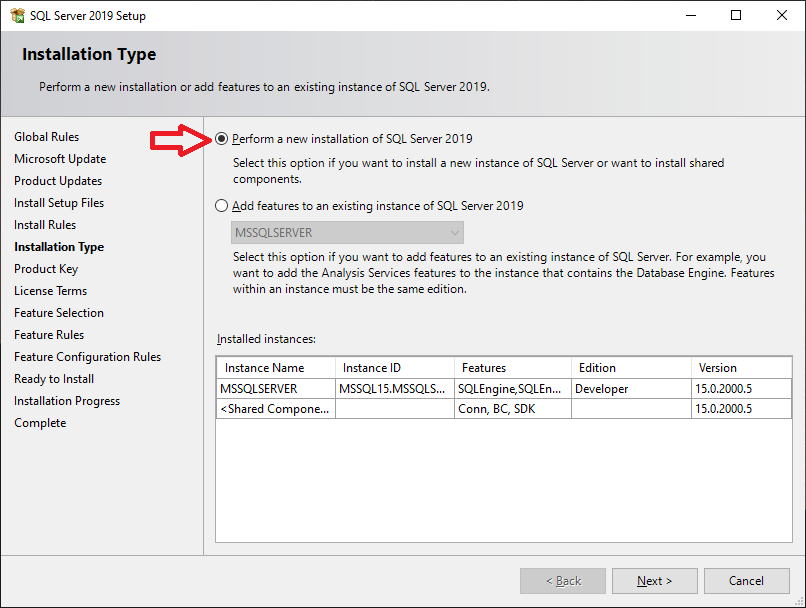
On the next screen we select the first option Perform a new installation of SQL Server 2019, the second is if we want to add a feature to a previous installation, eg Polybase.
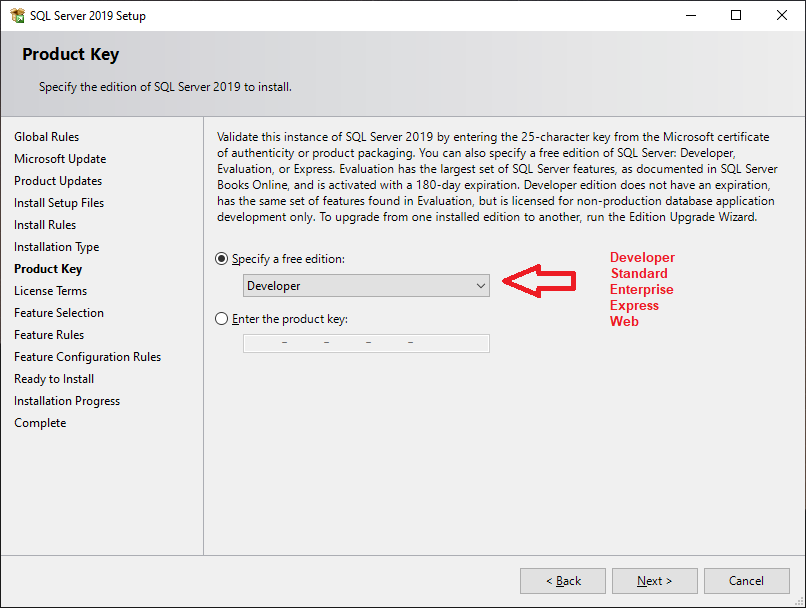
On the next screen we choose the version to install, for the example I will choose Developer which is free for trial purposes. Depending on the version we install there are different costs and different features are activated. Only the version is free for production use Express which has several limitations.
We can read the differences per version in detail here.
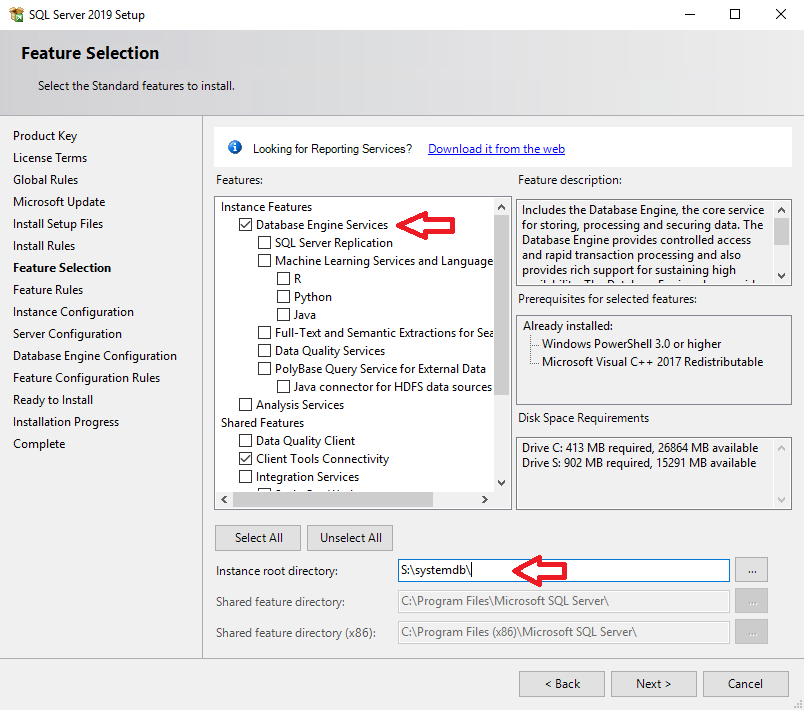
In the next tab we select them Database Engine Services. The other features are optional.
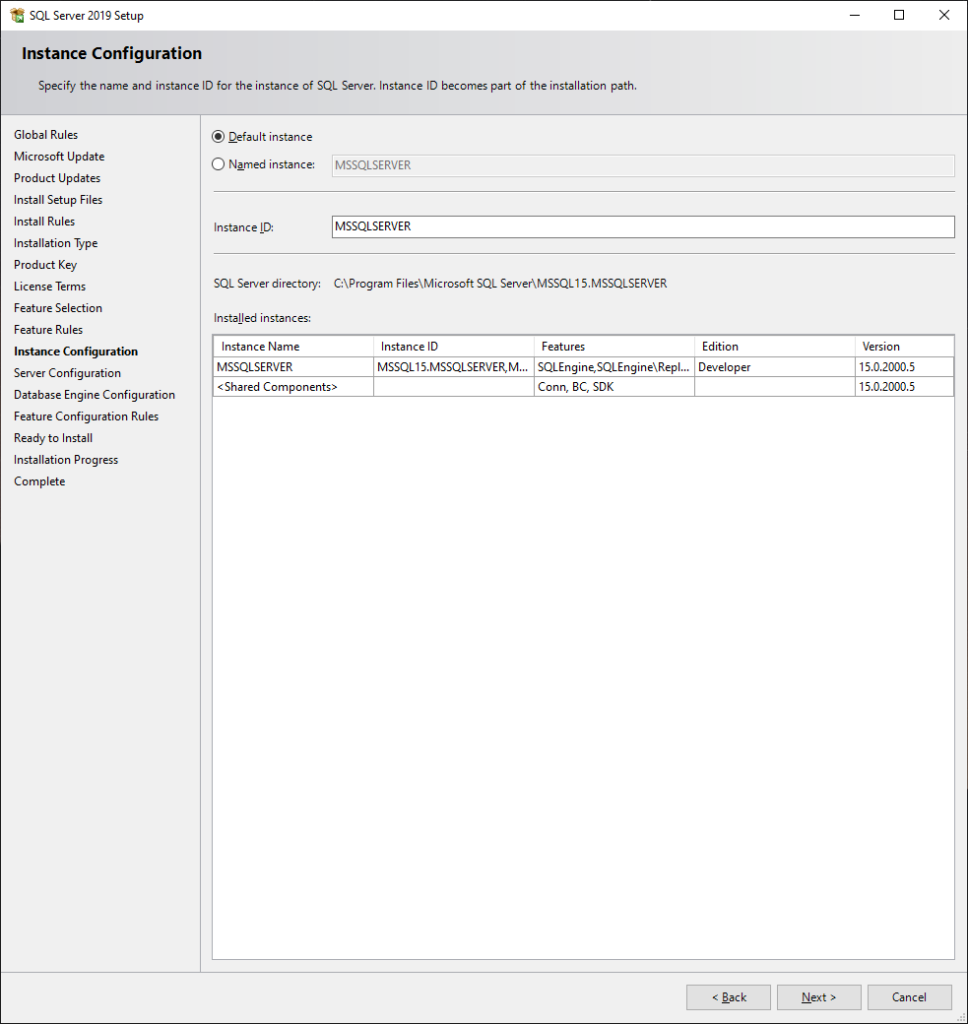
The instance root directory defines where the system databases will be installed, there we define them as a separate disk, e.g S:\systemdb\:
Then we choose whether to use it default instance and we will connect with it servername or we will use named instance and we will connect with servername\instancename. We leave it at default.
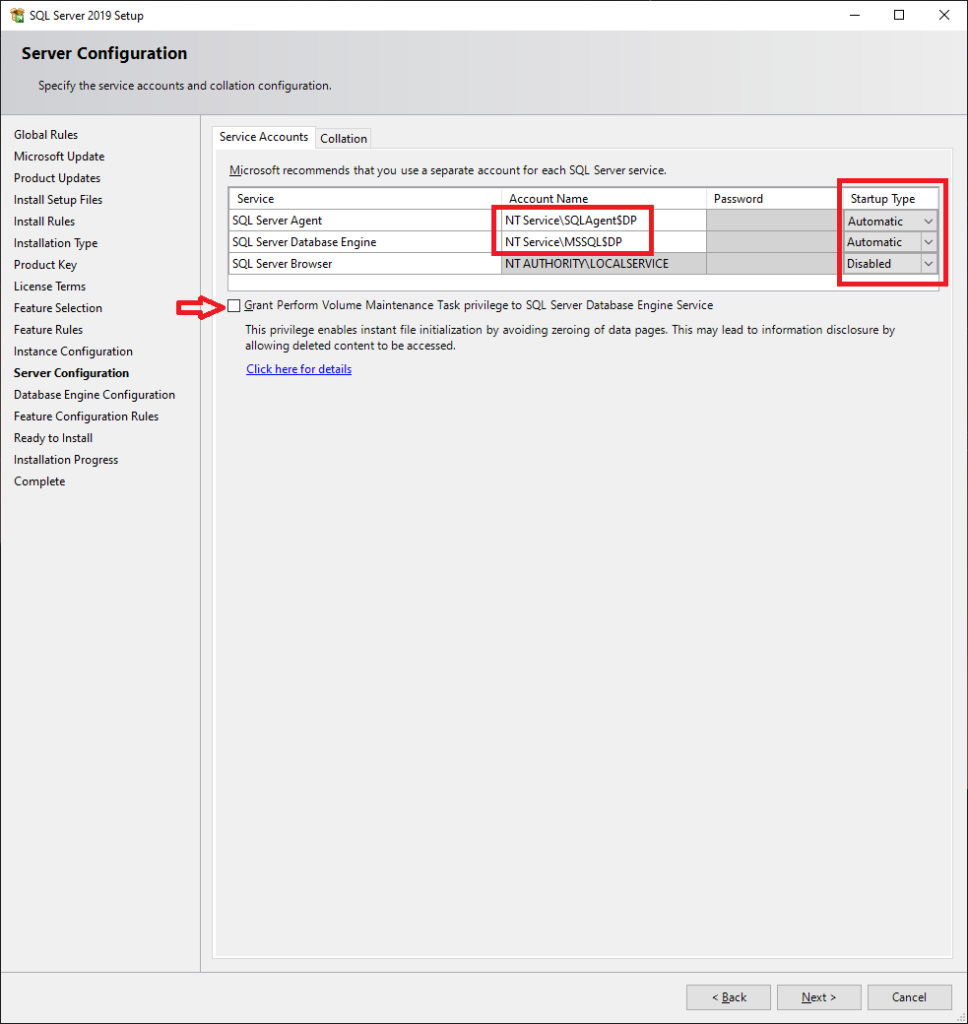
On the next screen we define the service accounts which will raise the Database Engine service and the Agent (which runs the jobs). There we should use the service account we created in the prerequisites. Then we put the startup type to Automatic so that the services stand up by themselves in case of e.g. restart the machine.
*In the event that the service account has not yet been set up for us and we leave the local default, we select it Grant Perform Volume Maintenance Task.
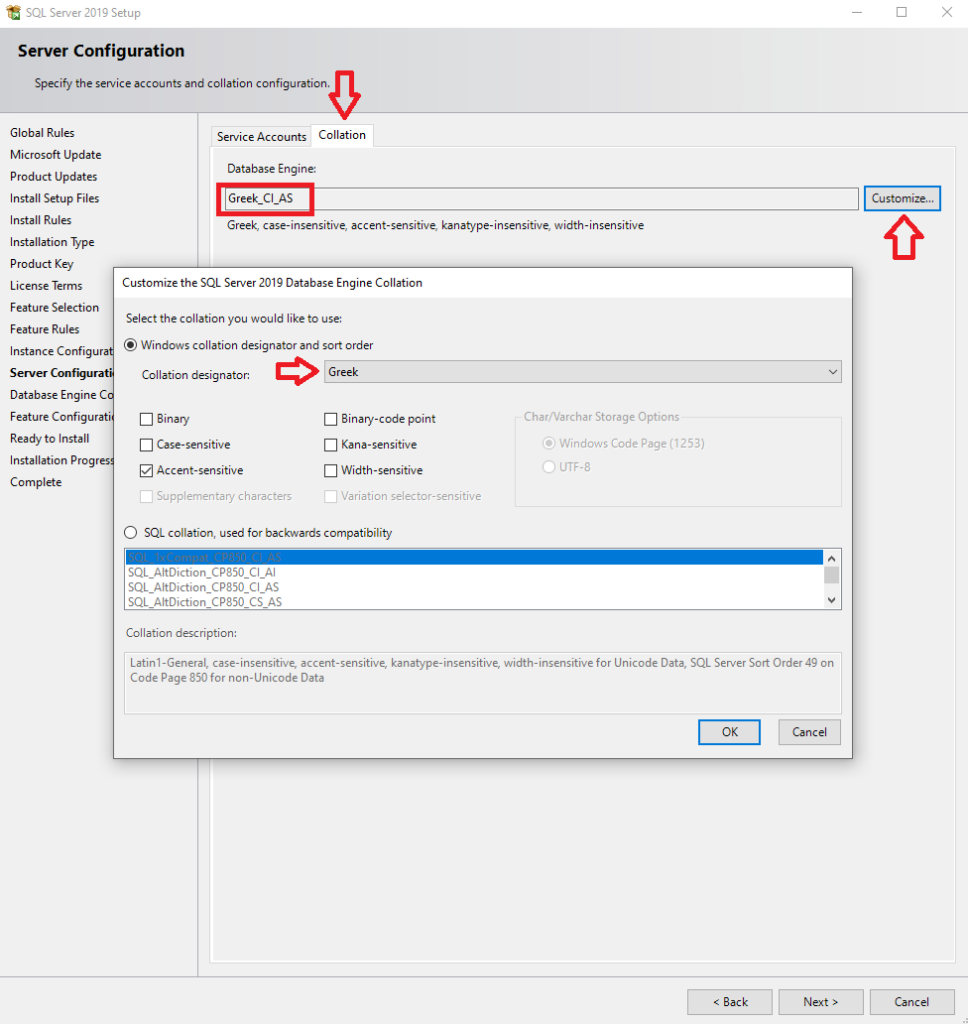
In the second tab with the Collation we put it Greek_CI_AS (the default encoding that the bases will have). To select this we select Customize, Greek and Okay.
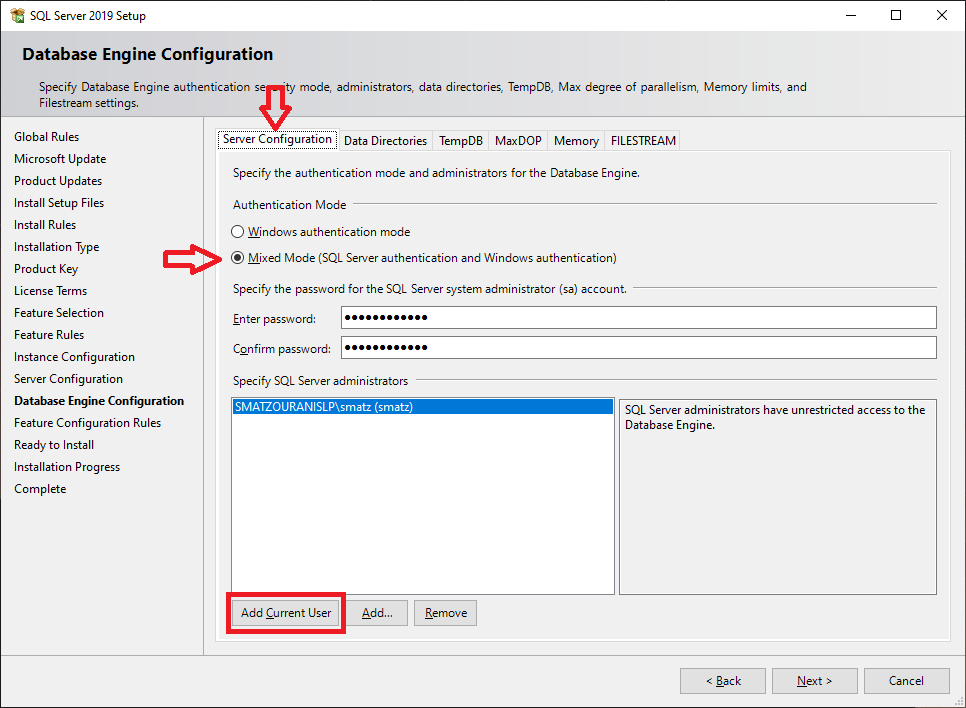
On the next screen in the tab Server Configuration define how we will login to the instance. We choose add current user so that the user with whom we install is super admin. Also we can choose mixed mode so we can add one sql login (sa) which will be super admin.
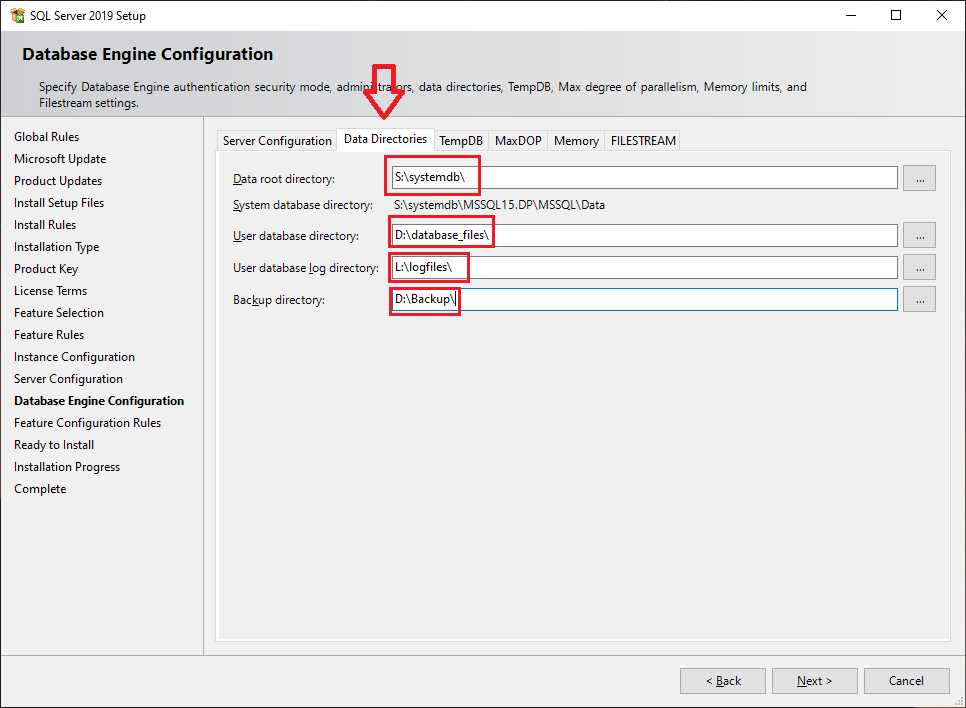
In the tab Data Directories we define on which disk everything will be saved as default. In the first field the root folder of all the path (since each one will be on a different disk it doesn't matter), in the second which will be the database files of the user databases, in the third which will be the transaction log files of the user databases and in the last what will be the location for when we backup.
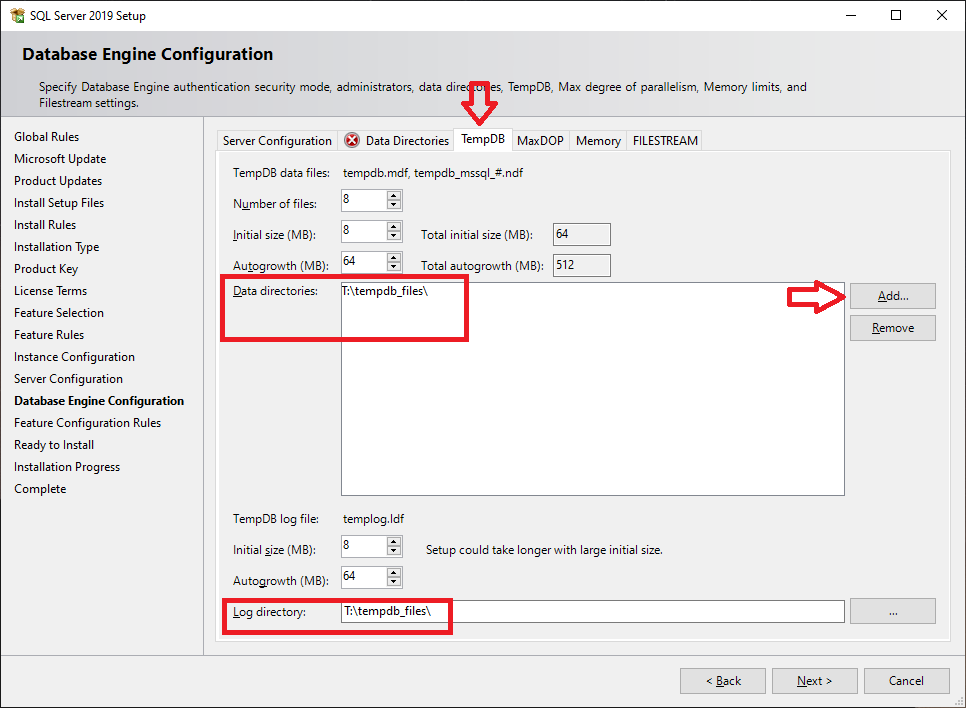
In the tab TempDB we remove that it can have and Add the path with the disk that tempDB will create, in our case on the drive T. We also put the corresponding path for the tempDB transaction log file.
By default we see that it has chosen to create 8 datafiles for tempDB, we don't need to bother with it.
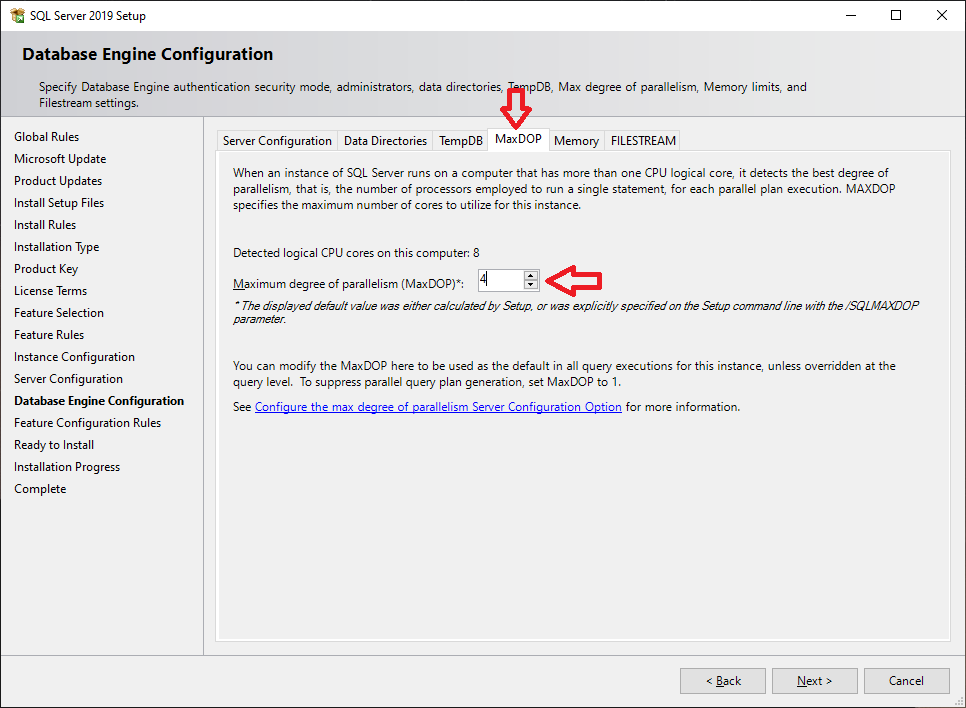
In the tab MaxDOP we define the maximum degree of parallelism in cpu logical cores of a query. To SQL Server 2019 it recommends us by itself, e.g. with 8 logical cores it recommends us Max DOP 8. But if we have installed on the same machine and another instance we would not want it to be able to use 8 logical cores and maybe 4 is better. Also we should remember that if we give above logical cores on the machine it will never use more than 4, so if we want it to use up to as many logical cores as it has without changing the setting, we should set it to 0.
We can see in detail what price Microsoft proposes per case here.
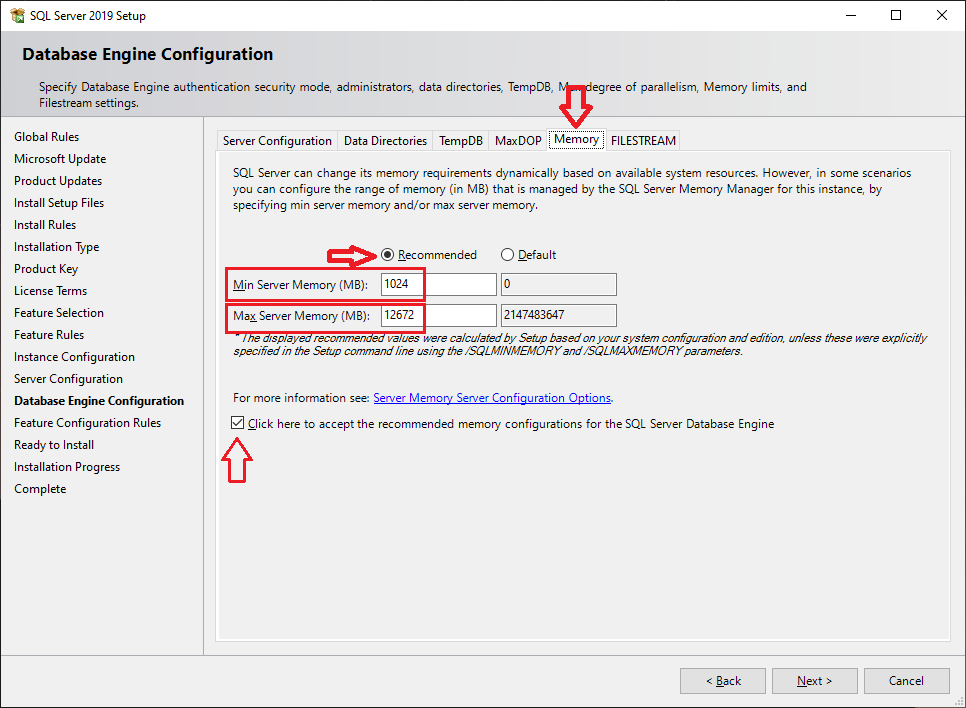
In the tab Memory we define it Max Server Memory (RAM) which the SQL Server instance will use. An instance when it starts takes up space from the memory and when needed it takes up more, which will only be released when we restart the instance.
We always leave at least 4 GB free for the operating system.
In the example we have 16 GB of RAM and it suggests 12 GB. Of course, if we have multiple instances, we should divide this 12 accordingly. We also define 1024 MB so that the instance with which it starts occupies this memory from the beginning (Min Server Memory).
*In order for it to accept the values we entered, we must also select the checkbox.
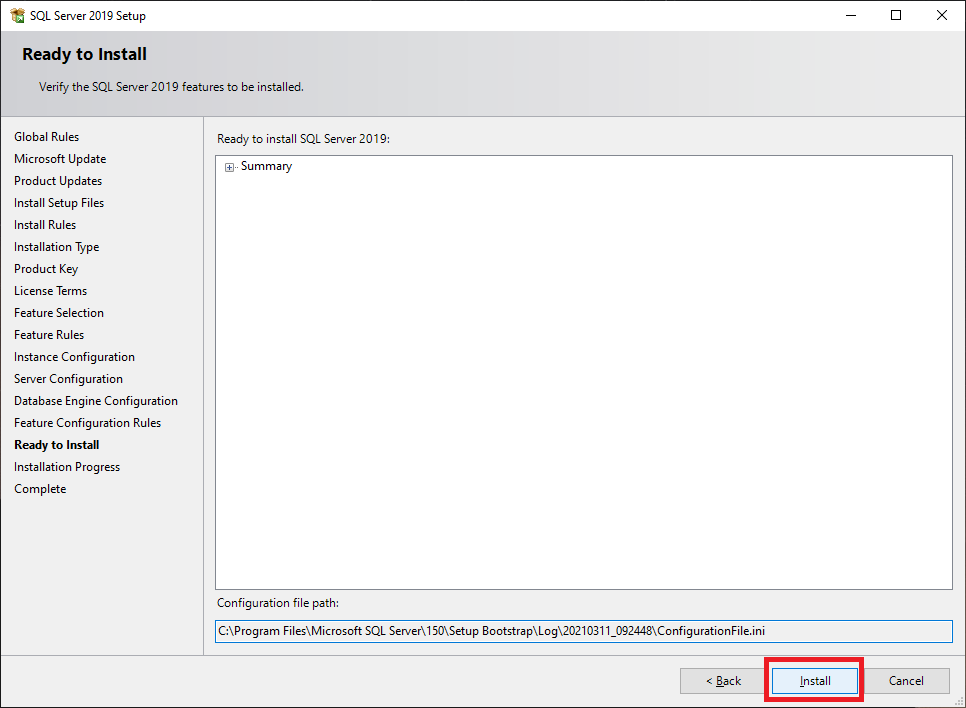
Then, after making sure from the Summary that we didn't forget anything, we proceed to Install.
To now connect to the SQL Server Instance we can do it beyond Command Prompt with its use SQL Server Management Studio (DBA oriented) or with the Azure Data Studio (Developer/Analyst oriented).
Patching with the latest update
But we are not finished here. We should install the latest Cumulative Update which fixes bugs and security risks that have arisen (it can also add new features).
We can download directly from Microsoft the latest for the SQL Server 2019 from here.
The process is very simple with a next next Wizard.
How we connect remotely
We finished the installation but we want to connect.
In order to be able to connect online from another computer, besides of course we should have opened the firewall the doors 1433/1434 which are the defaults.
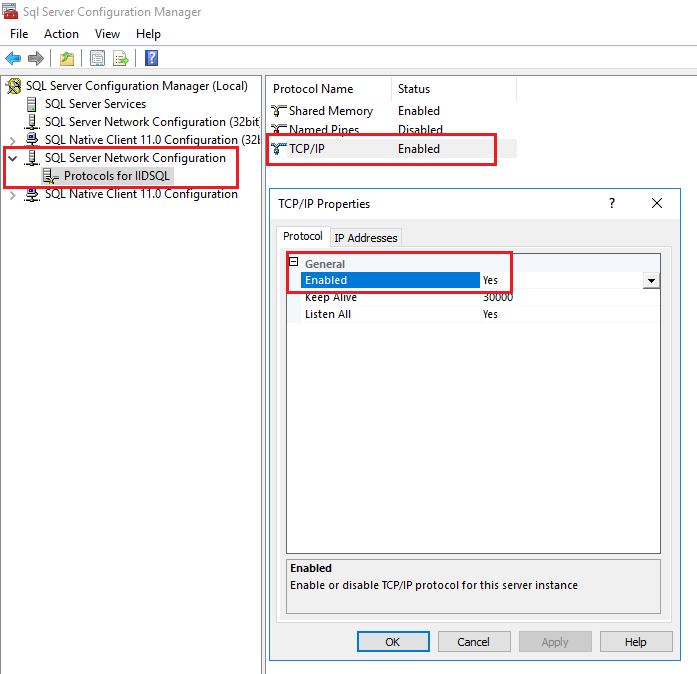
Also we should go to the tool Sql Server Configuration Manager which was installed with SQL Server.
Let's go to the tab Protocols for... under the SQL Server Network Configuration. There we choose it TCP/IP and on the tab Protocol in the Enabled we put Yes (if not already) .
Security through obscurity
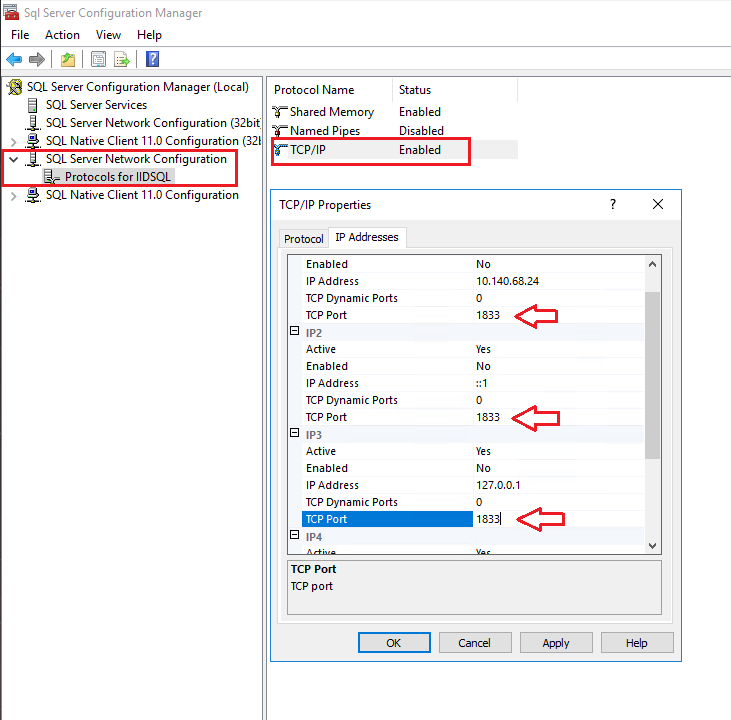
As we said before the default port of SQL Server is 1433. But we can let's change it so that someone who simply puts in the connection cannot connect servername and need the servername and a port that he won't know what it is. e.g servername, 1833.
To make this change to the tool Sql Server Configuration Manager which we saw before. Go to the tab Protocols for... under the SQL Server Network Configuration. There we choose it TCP/IP and on the tab IP Addresses in all the TCP Port fields we define the port we want.
*Don't forget to open this door in the firewall as well.
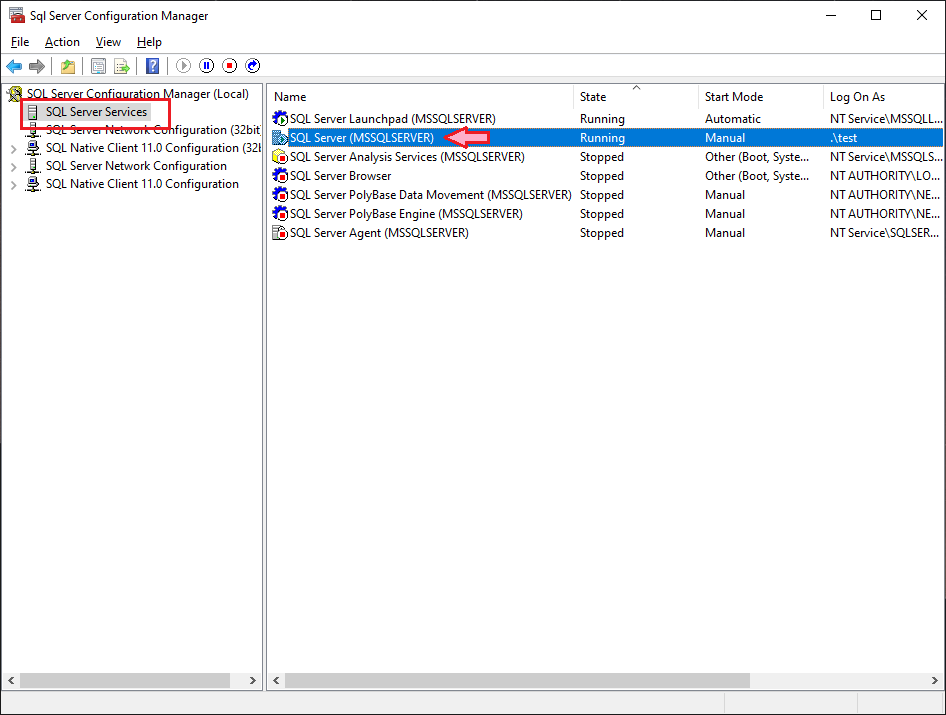
For these changes to take effect we must go to the tab SQL Server Services find the Database Engine service and right-click Restart.
Some more Performance Tweaks Recommendations
In addition to the choices we made during the installation with the graphic, for the best possible performance you suggest we tease with T-SQL two other parameters.
One is the cost threshold for parallelism which defines by how much "cost"* and above allows a query to open parallel. When the value is low, SQL Server creates a plan for parallel execution and on "light" queries. This can result in one thread waiting for the other to finish to return the result of the query. We see this delay as CXPACKET wait type. For this reason, you suggest changing the value from 5, which is the default, to 50.
*The "cost" is the estimated seconds that the query would take if it ran serially without parallelism, but not on our own Server but on some old machine that Microsoft had specified at the time.
Also the parameter blocked process threshold which defines how long blocking will be recorded by alerts, profilers and extended events related to blocking. Setting as 10 it will only record blockings that lasted longer than 10 seconds. We need it if we want e.g. to record the blockings as we have seen in the article here.
To apply these changes, we run the following in a query window on the instance:
EXEC sp_configure 'show advanced options', 1;
RECONFIGURE WITH OVERRIDE;
EXEC sp_configure 'cost threshold for parallelism', 50;
RECONFIGURE WITH OVERRIDE;
EXEC sp_configure 'blocked process threshold (s)', 10;
RECONFIGURE WITH OVERRIDE;
Bonus Script 1 (For Backup / Index Maintenance / Database Integrity Check SQL Server Agent Jobs)
With the following sql script that I have made, with just one click, it installs it MaintenanceSolution by Ola Hallengren along with ready configured jobs for Backup ,Database Integrity and Index Optimize with optimal parameters and timing.
Backup jobs are created disabled as we may have another solution for backup with a 3rd party tool. It also checks for Availability Group so that they run only if it is the Preferred Backup Replica (for backup / database integrity) and if it is Primary Replica (for Index Optimize).
All we need to do is run the following sql script on each SQL Server Instance:
Bonus Script 2 (To install all Extended Events monitoring)
With the following sql script we install all the Extended Events which we have seen in detail in other articles here. After first making the envelope xevents in the path c:\xevents where the data will be written or change the path in the sql script:
Bonus Script 3 (To install email alerting)
With the following sql script modifying it Profile who is the sender and the Operator which is the email masker with the corresponding email, smtp server and credentials, we can automatically receive emails that high criticality errors occur in Error Log of the instance. As we have seen in detail in the article here: