


What is TimescaleDB (Tiger Data) and how do we manage Time-Series data in PostgreSQL?

Certifications:

- What is TimescaleDB (Tiger Data) and how do we manage Time-Series data in PostgreSQL? - 2 November 2026
- How do we use pgvector in PostgreSQL for AI and Vector Search? - 26 October 2026
- How to enable Native Steaming Replication in PostgreSQL - 19 October 2026
In modern database environments, we are increasingly called upon to store and analyze Time-Series dataSuch data are, for example, sensor measurements (IoT), system monitoring metrics (CPU, RAM), application logs or financial transactions, where each record is accompanied by a timestamp.
When this data reaches billions of records, a classic table in PostgreSQL starts to face problems: indexes grow, the speed of INSERT and SELECT falls, and manually managing partitions becomes a hassle.
Here comes the TimescaleDB (which has now been renamed to TigerData, although at the package and command level it retains the name timescaledb). It is a PostgreSQL extension that turns it into a Time-Series database, without losing anything from PostgreSQL. Its two biggest features are:
Hypertables & Chunks: Automatic partitioning of data based on time, without any manual intervention from the DBA.
Hypercore (Columnar Compression): Converting older data from rows (Row-store) to columns (Columnstore) and compressing it, often saving over 90% disk space.
In this article we will see step by step how to install, configure and use the TimescaleDB in an environment PostgreSQL 14 and RHEL Linux 7.
Installing TimescaleDB
First, we add the official TimescaleDB repository to our system, in this case it is RHEL 7:
sudo tee /etc/yum.repos.d/timescale_timescaledb.repo <<'EOF'
[timescale_timescaledb]
name=TimescaleDB
baseurl=https://packagecloud.io/timescale/timescaledb/el/7/$basearch
enabled=1
gpgcheck=0
repo_gpgcheck=0
sslverify=1
metadata_expire=300
EOF
We clean any old repositories and its cache yum, and proceed to install the package for PostgreSQL 14:
sudo rm -f /etc/yum.repos.d/timescaledb.repo
sudo yum clean all

sudo yum install -y --nogpgcheck timescaledb-2-postgresql-14
TimescaleDB comes with the tool timescaledb-tune, which reads our server resources (CPU, RAM) and automatically adjusts the file postgresql.conf for optimal performance, while also adding the TimescaleDB library to shared_preload_libraries:
sudo timescaledb-tune --pg-config=/usr/pgsql-14/bin/pg_config
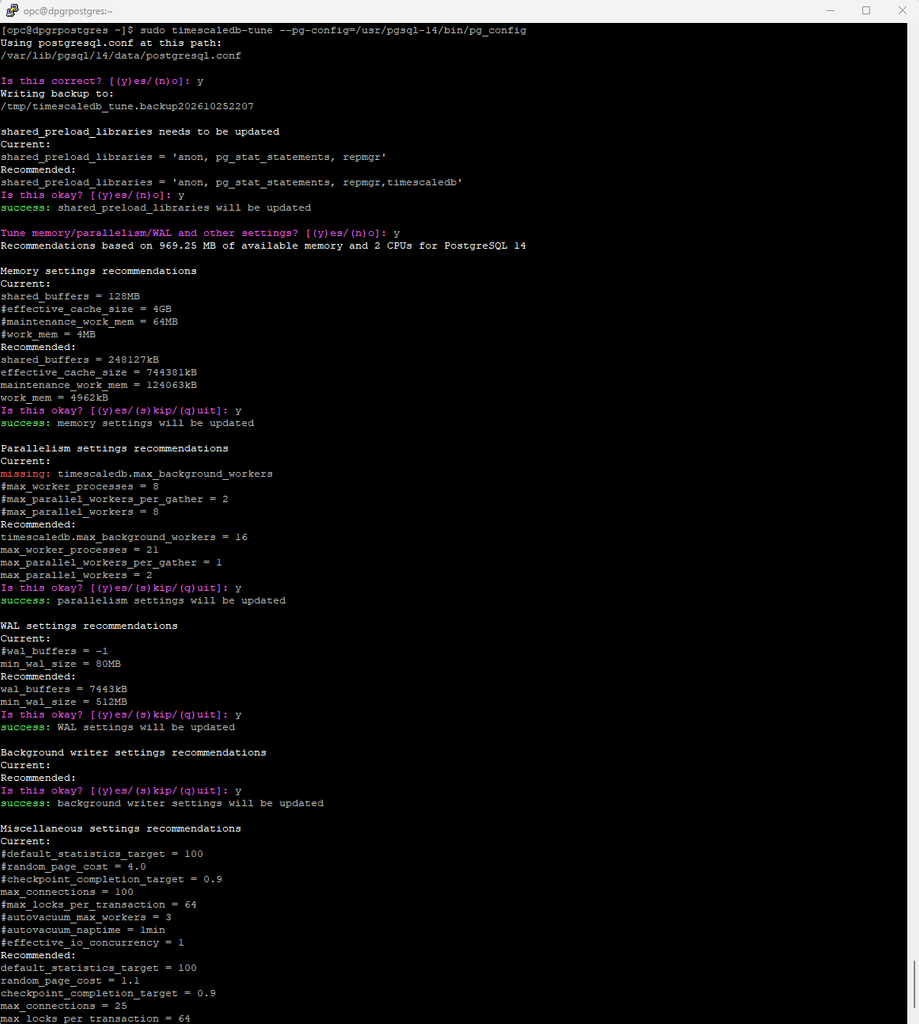
Once the configuration is complete, we restart PostgreSQL for the changes to take effect:
sudo systemctl restart postgresql-14
We connect to PostgreSQL and activate the TimescaleDB extension:
sudo -u postgres psql
CREATE EXTENSION IF NOT EXISTS timescaledb;
Creating Hypertable and Importing Data
The Hypertable is the main advantage of TimescaleDB. To the user it looks and works just like a regular table. But behind the scenes, TimescaleDB automatically breaks the data into smaller temporal partitions called Chunks.
First, we create a classic PostgreSQL table that will hold sensor measurements:
CREATE TABLE sensor_data (
    time TIMESTAMPTZ NOT NULL,
    sensor_id INT NOT NULL,
    temperature DOUBLE PRECISION,
    cpu_load DOUBLE PRECISION
);
Then, with a single command, we convert it to Hypertable, specifying that we want it to be automatically divided into Chunks per 1 day (INTERVAL '1 day') based on the column time:
SELECT create_hypertable('sensor_data', by_range('time', INTERVAL '1 day'));
Let's now insert 100,000 random records with a range of the last 10 days to test its operation:
INSERT INTO sensor_data (time, sensor_id, temperature, cpu_load)
SELECT
    NOW() - (random() * INTERVAL '10 days'),
    (random() * 50)::INT,
    20.0 + (random() * 15.0),
    random() * 100.0
FROM generate_series(1, 100000);
Without having to create any partitions manually, TimescaleDB saw the timestamps of the records we entered and automatically created the corresponding daily Chunks. We can see them by running the following query:
SELECT chunk_name, range_start, range_end, is_compressed
FROM timescaledb_information.chunks
WHERE hypertable_name = 'sensor_data'
ORDER BY range_start DESC;
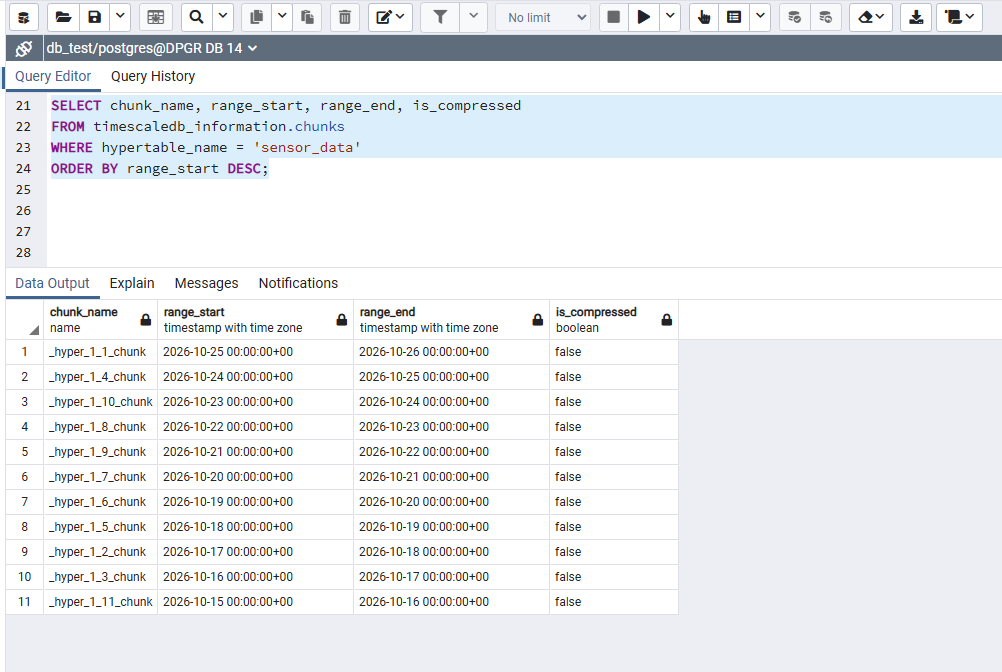
We will see that our table has already been divided into individual daily chunks, making queries that search for specific dates extremely fast.
Enable Hypercore (Columnstore / Compression)
In Time-Series data, recent data is constantly receiving new entries, but older data (e.g. from previous days or months) remains static and is used for reading only (reporting/analytics).
Through architecture Hypercore (Columnar Compression), TimescaleDB allows us to compress old Chunks by converting them from row-based storage to column storage (Columnstore).
First, we enable the compression/Columnstore feature on our Hypertable, defining how they will be grouped (compress_segmentby) and how they will be classified (compress_orderby) the data inside the compressed chunks:
ALTER TABLE sensor_data SET (
    timescaledb.compress,
    timescaledb.compress_segmentby = 'sensor_id',
    timescaledb.compress_orderby = 'time DESC'
);
Manual Compression
If we want to immediately (manually) compress all Chunks that are older than 5 days, we execute:
SELECT compress_chunk(i)
FROM show_chunks('sensor_data', older_than => INTERVAL '5 days') i;
Automated Compression (Compression Policy)
In practice, we don't want to run the compression manually. We can define a Compression Policy, so that TimescaleDB automatically compresses each Chunk in the background once it is over 5 days old:
SELECT add_compression_policy('sensor_data', INTERVAL '5 days');
If for any reason we want to remove the automation policy, we run:
SELECT remove_compression_policy('sensor_data');
To check active background compression jobs:
SELECT * FROM timescaledb_information.jobs WHERE proc_name = 'policy_compression';
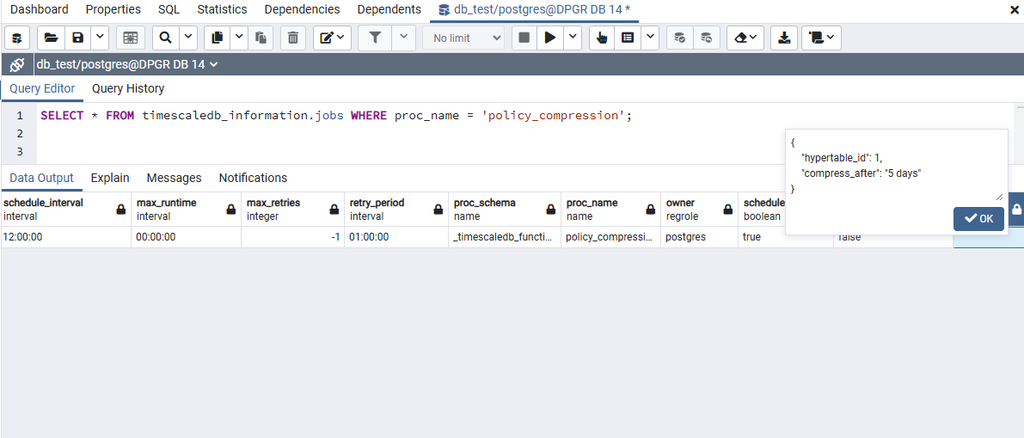
To see how much space we saved before and after compression, we run:
SELECT * FROM hypertable_compression_stats('sensor_data');
In the results before_compression_total_bytes vs. after_compression_total_bytes, we can observe the reduction in the size of our data, while continuing to do normal SELECT on the table sensor_data without changing anything in our application code!
